Thursday, July 29, 2021

Never Too Early with Island Batik - Hunter Star Table Runner


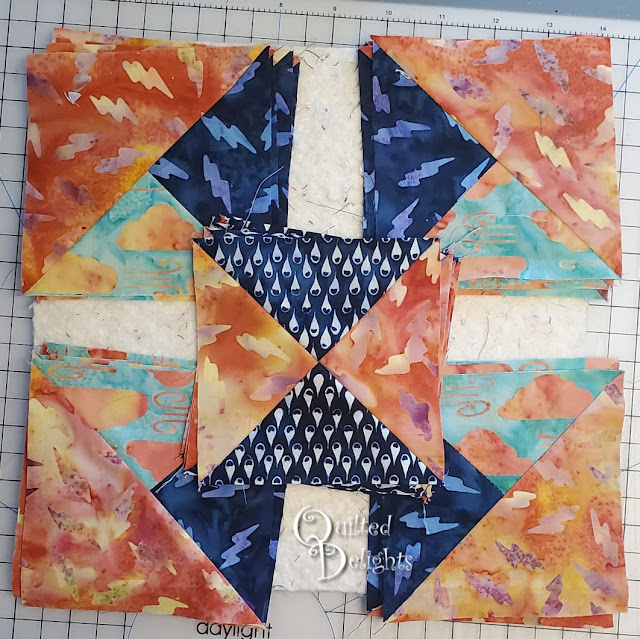
It is never too early to start on those holiday projects! This month, Island Batik Ambassadors were challenged to make a holiday project to get things rolling for the holiday season! I chose to make a quick Hunter Star table runner for one of my small end tables.


I used some of the 5 inch strips from the stash builder sets that came in my Island Batik Boxes along with some left over scraps I had from other Island Batik Projects. The white is called Sprinkles, one of my favorite neutrals from Island Batik.


I used the Hunter Star die from Accuquilt to help me get the pieces cut out.
This die is so nice to have.  I purchased this one myself and I am glad I did.  I thought I would cut a couple pieces out by hand because I didn't have that many pieces this time around, but they didn't sew together as nice as when the fabric gets cut through the accuquilt cutter.  Having precisely cut pieces with the notches already cut out makes a whole world of difference when piecing everything together.


Of course everything was sewn and quilted with a Schmetz Needle. I got some in my first Island Batik box in January, but they are also the only ones I buy when I need more.  They never let me down.
I used a universal 80/12 for this one.


And there is Hobbs inside!  Soft and comfy just for kitties to rest on. 


I have now used up almost all the Hobbs Poly-Down premium polyester batting they sent me.  I got several projects out of this bag and I probably have enough to make another small square table topper.


The colors in this table runner were inspired by an image I saw on Pinterest. I didn't use the same cutting and piecing method or layout, but I really liked like the green, red, and gold color combo she used. You can see the original inspiration post here:


Happy Quilting!

=^..^=


Monday, July 26, 2021

It's a Guy Thing Blog Hop


Welcome to the first day of the "It's A Guy Thing" blog hop, hosted by Carol of Just Let Me Quilt.
For this hop we were challenged to make something for a guy or tomboy, or in manly-man colors of blues, grays, browns, etc.


Sitting in my stash was a layer cake perfect for this hop, it was full of blues, browns, and grays.  So it only took a few seconds to pick out the fabric for this hop, I just had to grab the layer cake.  

The block I wanted to make came to me quick too. There are so many different layer cake patterns, but I decided on Delectable Mountain blocks.  I'd been seeing different versions of this block pop up on Pinterest lately when I looked up other things, so it was already sitting in the back of my mind, waiting for the right time to come out and this blog hop was it.


I paired it with some Kona cotton in Coal and used 40 of the 42 squares to make 80 Half Square Triangles.  Once trimmed up, I cut each HST into four strips and rearranged them to make the "mountains". 

You have to make sure to cut half of the HSTs one way and the other half the opposite way in order to get two mirrored sides of the mountain.  I used You Tube and searched "Delectable Mountain quilt" and found a couple videos with some good instructions to make sure I didn't screw it up.


I played around with the layout for a bit and decided on diamonds in the center flanked by mirrored zig zag mountains on each side.


The back of the top looks pretty cool.  It was windy on the side lawn to get a good picture of the top,


So we moved the the side porch.


Here is the top before its quilted....


and after it is quilted and bound later in the evening.


I intended to quilt large wavy curves, but as I was echoing the first row of curves, they started turning into what I thought looked like topographical lines so I just went with it.


Pieced my backing again.  That brown in the center is the last of that fabric in my stash.  Feels good to use all of something up with little to no scraps left behind.


This was my first time making this block.  It was super quick and easy.  Way easier than I thought it would be.  I think it took me longer to square up my 80 HSTs then it did to sew the blocks together.


Thanks again to Carol for hosting the hop and inspiring me sew up some dandy delectable mountains!  

Make sure to check out the other hoppers today to see what they were inspired to make.

Friday, July 23, 2021

Island Batik Ambassador 2021 Challenge Box #2


Island Batik Ambassadors received their second challenge box this month. It has everything we need to complete the monthly challenges for the rest of the year, minus a couple precuts that will come later on.

Check out the video below to get a close up of the goodies Island Batik and their affiliates sent for me to play with for the rest of the year.


Special thanks to By AnnieAurifilHobbs Batting, and Studio 180 Designs for sending their tools and materials to help with our projects.


=^..^=

Sunday, July 4, 2021

Stars and Stripes Quilts for July 4th


Happy July 4th!

I finished two Stars and Stripes quilts this week just in time for the holiday.
Pattern is by Thimble Blossoms.


Around the end of June last year, I went through my Island Batik fabric leftovers and I cut out some red and blue fabrics with the intension of finishing these before the 4th last year...


Fast forward one year and they are finally complete. I added a couple different blues I collected through out this year and am glad I did.  No two blue rectangles are the same in one quilt.


I was going to make both quilts using aqua sashing as shown in the pattern but changed my mind after seeing some others on Instagram. 


When I finished the top for the aqua sashing I had looked on Instagram for some quilting inspiration and saw several made with darker sashing.


Luckily I had just enough if the dark navy fabric for the second quilt, and was able to stick with all Island Batik fabric for both tops.


These were quick to sew up.  I pulled out what I had already cut on Monday and by Saturday morning I had both tops together, quilted, and bound.  I worked on them a few hours every night after dinner last week.  

Having the long arm sure helps.  I am so glad I have that.  It only took one and half hours to quilt each one.


For the backs I dug out some oldy but goody fabric.  I have been collecting fabric as long as I have been quilting  and these guys have been waiting their turn to be used up.  I now only have a few inches of each that will go in the scrap bin for something else.


I had intended to make one for me and one to give away, but as soon as this one was finished I felt like it needed to go to my neighbor, so she is now the new owner of this one.


This one I gave away at my family 4th of July party.  I had a jar of red white and blue M&Ms and who ever guessed closest to how many were in the jar won the quilt.  It was fun.  I have been asked to bring a quilt to giveaway at every family function now.  lol.  We shall see...


I still have some left over blue rectangles and red stripes, so maybe I will make one for myself to keep for next year.

Happy Quilting and Happy 4th!

=^..^=
 

Wednesday, June 30, 2021

June Island Batik Challenge with Accuquilt


This month Island Batik Ambassadors were challenged to spread love and joy through quilting by creating and giving away a project using a Block on Board (BOB) die from Accuquilt  mixed with a block from the Accuquilt Cube Die Set.  

Gifting the quilt away was the easy part of the challenge.  Most of the quilts I make I usually give away.

I was talking to my nephew a couple weeks ago about this very subject.  He told me I should sell my quilts. I responded they are too expensive to sell so I just give them away. 

He stared at me confused and said, "That doesn't make sense, aren't you loosing money that way?"

I told him it is more fun to give them away to friends and family who will love them than to sell them.  He nodded and said, "That makes sense."  I will be passing this quilt on to a little friend.  


For this project I used the the new Island Batik fabric line called Forecast by Ebony Love of Love Bug Studios. It hit shops in May.


For this challenge I was sent the Arkansas Traveler BOB. It makes a 12 inch finished block.

The cube set makes 8 inch finished blocks.  Mixing an 8 inch block with a 12 inch block was the harder part of this challenge for me. 

My first thought was to make an 8 inch block and put a border around it to make it 12 inches, but I really wanted the block to meld into the Arkansas Traveler block so I kept thinking.


As I was thumbing through the book that comes with the cube set inspiration hit! I could take any of the blocks in the book set up as a four patch and insert more 4 inch sections to create a 12 inch finished block to go with the Arkansas Traveler block.


I settled on the Turnstile block with a plan to turn it into a 9 patch instead of a four patch.


I used the four original sections of  the Turnstile block for the outer corners. I used die #3 and die #4 in the cube set to make all these sections of the block.  The center hourglass block used die #4 as well. 


Four the triangle in a squares sections I used another die I had purchased muself. The 4 inch Triangle in a Square die. So other than the borders, this whole quilt was cut out with Accuquilt dies.


Everything sewed up super quick and lined up perfectly with the notches already cut out for me.


I used the last of the Hobbs polyester batting that came in my January box for a nice fluffy quilting look.


I quilted it using white Aurifil Thread and a  Schmetz 90/14 Quilting Needle.
Since this one will be used and washed a lot I did a quick all over meander.


The Arkansas Traveler Block


My newly created 12 inch finished block using the 8 inch cube die set.


When you place the two blocks next to each other they create a whole new look!
This quilt is like a big nine patch in itself.  The Arkansas Traveler block alternates with the new block in rows of 3 x 3.  It measures approximately 50 in square.


And another picture just for fun.

Happy Quilting!


=^..^=