Tuesday, December 31, 2019

3D Island Batik December Challenge - 3D Cubes

The Island Batik Ambassador challenge for December is to explore the world of 3D. We could use any method to make our quilts pop into life!


I went with with color play and regular piecing to create 3D cubes.


I have made two of these in the past for mini quilt swaps and they are easier than they look to put together. The other two I made were small versions and done in rainbow colors. This is my first big version done in similar colors and I am loving it!


This quilt does not have any Y seams that is one of the reasons it goes together so quick and easy. If you want to make one, the hardest part is probably choosing the different shades of fabrics to use. Once that is done, it's straight line sewing to create triangles and half hexagons.


To make one, each cube needs three shades of fabric: a light, medium, and a dark. I used 12 fat quarters from the Island Batik collection Steam Engine by Kathy Engle for Studio 180 Designs. These came in my second Ambassador box. I love these purples and blues. If you love them too you can pick some up in shops right now!


When picking out colors, make sure each shade has enough contrast compared to its counterpart. If the light and dark or dark and medium are too close they will blend together and from a distance the quilt will look more like flat diamonds instead of 3D cubes. The light and medium set in the top left of the photo was cutting it close, but when I laid them out and tested them, I could still see the 3D cubes so I went with it.


To make the quilt I started with 2 1/2 inch strips to cut my triangle and half hexafon pieces.


To make one cube you need 2 half hexagons and 2 triangles from each of the three colorways. I used the Hex N More Ruler from Jaybird Quilts to cut mine out, but you can use any tool that will help you cut half hexagons and 60 degree triangles from a strip.


To create the two toned triangles, take a half hexagon and pair it with a triangle from one of the other tones and sew them together. For example, If I start with the two light half hexagons, I will sew a medium triangle on one and a dark triangle on the other. This step goes pretty quick if you string piece them all together.


Sew all the light half hexagons and then go on to the medium half hexagons adding triangles to those and then finish up with the dark half hexagons.


Take the six triangles and lay them out into a hexagon making sure the lights and mediums and darks touch. I pick which way I want the shadow to face and then lay out the triangles that way.


Only sew half of that hexagon together. This way prevents having to sew Y seams. This method is just like creating a One Block Wonder quilt, if you have ever done those.


I sew two triangles together then add the third one.


Again, only sew half the Hexagons, do not sew the two halves together.


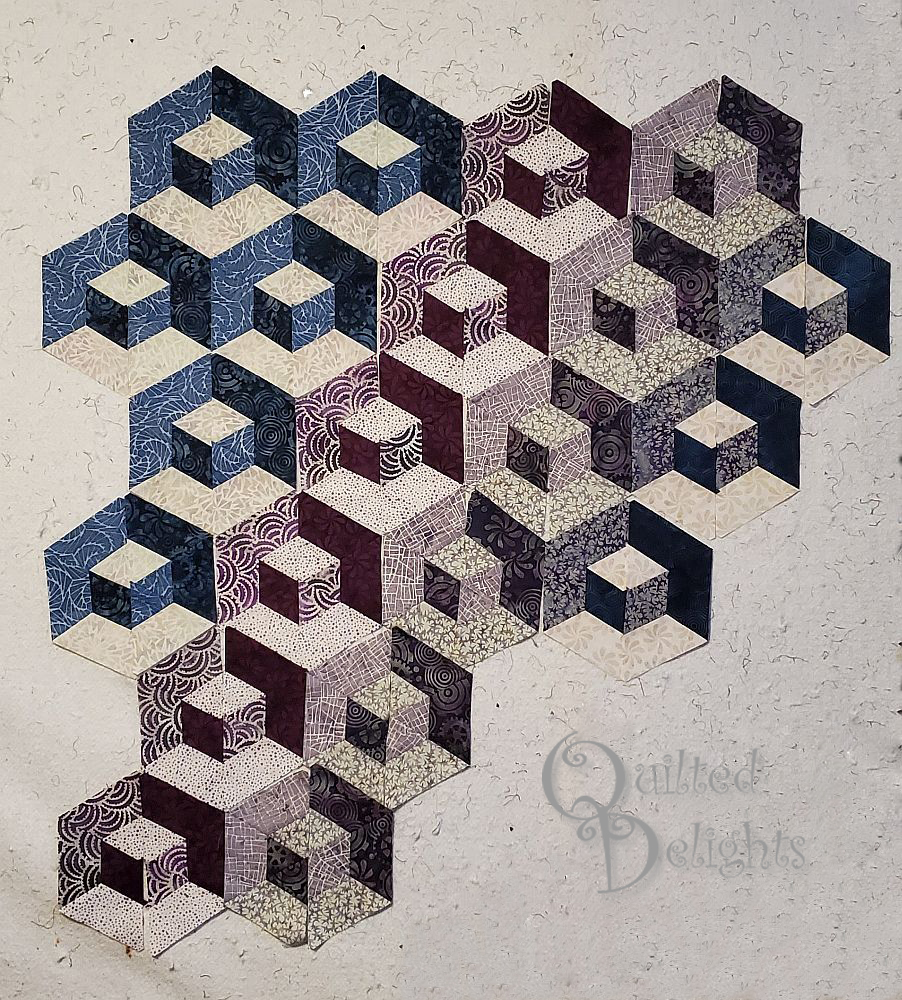
Once all the halves are sewn, lay out all the cubes to whatever design you like. I added some side half hexagons to fill out the sides in my version.


Sew the half hexagons together by rows based on the layout. Once all the rows are done, sew those together to make the top. This part is easy sewing but gets a little time consuming to pin and match all the points to make sure everything lines up right.


I used Hobbs Tuscany Cotton Wool batting. It quilted up fantastic!


I enjoyed slowing down with this quilt and enjoyed the process, watching each block and row come together to create the 3D illusion.

This quilt measures 40 x 54. It's a nice lap size.


This is also my fourth finish for the final quarter of the 2019 Finish-A-Long.
You can see my whole ambitious list here.


=^..^=

Wednesday, November 20, 2019

A Piece of ... Island Batik Blog Hop


Today is the last day of the "A Piece of ..." blog hop, hosted by Island Batik fabrics, and I am excited to show off my creation.


 The hop has been showcasing the new Island Batik fabric lines that will be hitting quilt shops now and in the next couple months.


I was sent the Tweet collection earlier this year and of course that made me want to sew something  bird related.


I also wanted a pattern that would show off as many of the the 32 different fabrics I was sent.


I went with the Arctic Feathers pattern by Elizabeth Hartman.  She also has a brand new pattern called Pretty Birds that I am want to use my left over Tweet fabric with.  I want to make the full version of Pretty Birds which requires 40 different fabrics, so I will have to supplement some Island Batik Basics to go with my Tweets.  Look for that project near the beginning of 2020.


For the pieces of these feathers, I used all the fabric I was sent except for four of the blacks.
One of the blacks I used for binding and the last three will have to go in another project in the future.


  For the background I used the solid gray which was also sent in the Ambassador boxes that came this year.  I had been waiting for the right project to use this solid gray batik and these feathers were perfect. The gray is just right for the dark prints and perfect for the light prints too.  It blends well with all the different colors.


I quilted it using Aurifil 50wt grey thread. 
I used this thread on my last ambassador project as well.
It runs super smooth in my machine.


I also love how the thread has a tiny shine to it.  Not super shiny like embroidery thread, but just enough to make the quilting look fabulous.


For the batting I used the Hobbs Heirloom Premium 80/20 Bleached Cotton Blend Batting that came in my Ambassador box.  It is good for white or very light colored fabrics to keep them nice and bright. A lot of the Tweet fabrics are already bright or darker, but I wanted to make sure the light grey background and the lighter yellows would stay nice and bright.

Make sure to check out  Jennifer Thomas today as well. She will also be showing off her Tweet project.  And if you missed any of the others check them out below.  They have all shown off some fantastic quits the past two weeks!


Monday, November 4:


Tuesday, November 5:


Wednesday, November 6:


Thursday, November 7:


Monday, November 11:


Tuesday, November 12:


Wednesday, November 13:


Thursday, November 14:

Monday, November 18:


Tuesday, November 19:


Wednesday, November 20:


=^..^=


Friday, November 15, 2019

Stitch It Gift It Blog Hop

I am happy to be rounding out the Stitch It, Gift It Blog Hop hosted by Carla of Creatin' in the Sticks.
I have two quilty gifts I have been working on. Both of them are Holiday quilts.  The first one you may have already seen as it was part of the Halloween Blog Hop of 2018, but it was only a top then.


It is the Halloween One Block Wonder I had been working on.  I had fully intended to keep this quilt for myself, but as I was posting photos about this on Instagram, my brother kept making comments about how much he liked it.

 Usually he will comment one time, but this time he mentioned several times that he really liked it.  So I decided it needed to live with him when it got quilted.

This was the first one block wonder quilt I had made with a panel and I didn't want to loose any of the picture, so I bordered it in black then surrounded it with the hexagons.
I love this panel so much and knew I would really miss it when I finally sent it off, but I also felt it belonged in Washington state with my brother.  

A couple weeks after I made the decision to let it go I saw the same panels on sale at 50% off.  I figured that was sign and bought 7 more panels to make another one for myself.  

I was hoping to have my brother's version quilted and ready to go by Halloween this year, but as most UFO's do it hovered around a little longer than I anticipated.  But it is done now and ready to go.  He is expecting it and is excited to have it ready for next Halloween.


My version above omitted the black border and I ended up trimming the panel a little on the sides. Mine needs a small top and bottom border and some quilting and then it will be done. Both of these Hallowen One Block Wonders are on my 4th Quarter Finish-A-long list so the goal is to finish mine by the end of the year.


One thing I like about these two quilts is that when mine is finished, there will be two similar versions of this quilt, one on each side of the country. When I look at mine, I will think of my brother and when he looks at his, he will think of me.  Two quilts connected across America through Halloween stitches and sibling love.  What could be better than that.


The next quilty gift I am working on is a Christmas Quilt.  Yep, I am one of those people who go from Halloween right to Christmas.  I love getting all the red, green and gold out.


I have four siblings and have made a Christmas quilt for all of them but one. My oldest sister has yet to have receive a festive quilt from me for the Holidays.  So this year it is her turn.


Since my sister lives across the country, also in Washington state, I don't always get to see her Christmas decorations. For her quilt I was debating on going with aqua, red and green, or traditional red and green, but wasn't sure which one would fit her current style, so I decided to go right to the source and ask. Traditional red and green won out.


I used some red 2.5 inch strips from a pre-cut I had and some greens from a fat quarter bundle I had been holding on to.


For the pattern I wanted to do something with with Trees.  My Sister lives in the Pacific Northwest right on the edge of the forest with lovely tall trees surrounding her.

These trees aren't necessarily the Douglas Firs or Western Hemlocks of the area, but with a little imagination they might could pass for them.  The original pattern comes from a book called Make Room for Christmas by Nancy J. Martin.


This one is still a flimsy.  My original plan was to do a small lap version, but my husband convinced me to go big this time.  He mentioned she couldn't cuddle with her hubby at Christmas time under a small quilt.  So I made more red and white blocks and more trees.


 Since this will be her first Christmas quilt from me I want to do a little custom quilting and make it fancy.  Since I spent a little extra time on the piecing I didn't have the time I wanted to quilt it like I want in time for the hop. 


But the backing is sewn together and batting is picked out and the plan is to have this quilted and mailed after Thanksgiving.


This has been a fun hop that inspired me to get my gifts finished and it has been fun to see other gift inspiration, from from large to small, from all the other bloggers. There is something to inspire everyone.  

Make sure to check out all the other posts.   If you missed any here is the full list of all the hoppers.  Make sure to visit their site and see what inspiration they may have for you.


Stitch It and Gift It Blog Hop Schedule


=^..^=

Wednesday, October 30, 2019

Top It Off - Island Batik October Challenge - Bats on the Run


I've been sewing up a festive Halloween storm this month.  Almost every project I've worked on in October  has involved Halloween themed colors or prints, this next one is no exception!


For the October Island Batik Ambassador challenge we were asked to make a festive table topper or runner.   As an Island Batik Ambassadors, I was provided with fabric to create these challenges. Since we are in October, I opted for a Halloween project.


Part of this challenge was to incorporate applique.  I wasn't quite sure what spooky addition I was going add to my runner until I went to pick up my older Bernina from the quilt doctor and they had Accuquilt dies on sale.  I could not resist bringing home the Cat and Bat die.
I put some wonder under on the back of my Island Batik Fabric and ran it through the machine.  The bats came out perfect and ready to iron on.

This runner has 36 Quarter Square Triangles.  I used the two at a time method and started out with 3.5 inch squares and trimmed down to get a 2.5 inch quarter square triangle.

The purple fabric comes from the Island Batik Foundations Basics collection. 
It is called, Purple.  Perfect name.


For my corner stones I used 12 economy blocks, aka square in a square.
I paper pieced these because my triangles always get wonky on these and one corner always ends up too small.  With paper piecing I get perfect points and can trim down to a perfect 2.5 unfinished block. These Island Batik fabrics came from the Stash Builder Rolls I got in my first box in January.
These stash builders 5 inch strips x WOF and are perfect for scrappy quilts and small projects like this.  I recommend picking one up if you ever see them in your local quilt shop.  They are my "go to" when I am looking for a specific color for a project.


 Table runners are a great way to use the extra wide batting strips you have left over from previous quilt projects. I had the perfect size of leftover Heirloom Hobbs 80/20 with scrim for this project.   

I love this batting! It lays flat yet still has a nice fluff to it.

This bat filled runner got quilted with Orange and gray 50wt Aurfil thread.
I even used the gray on the black fabric.

I like how the grey thread gives more detail to the bats and quarter square triangle blocks.
Almost like a spider web shine.


If really you like this runner and really want to make one for your self, I created a pattern to help you out. The pattern is free so go ahead and test it out for me. I have stared at it a lot trying to catch any errors, but if some slipped by let me know and I can fix it right up.  

You can get the pattern by clicking Here:


If you are not into bats, you can change the colors and applique design for any holiday. You can even use Novelty fabric for the center squares if you are not a fan of applique.


This is the set up in town on Main Street.  It is pretty cool and a great spot to take pictures of Halloween Quilts, even if one of the witches is having trouble with her hat.


This is also my first finish for the 4th Quarter Finish-A-Long!
Wahoo!!


Thanks for stopping by!


=^..^=