Wednesday, February 19, 2020

Color it Red Blog Hop

Welcome to my day of the Color It Red Blog Hop!  Hosted by Carol of Just Let Me Quilt.

All we had to do to play along was make a project that had red in it.
Today I am showing off what I made with some of my favorite shades from my stash.


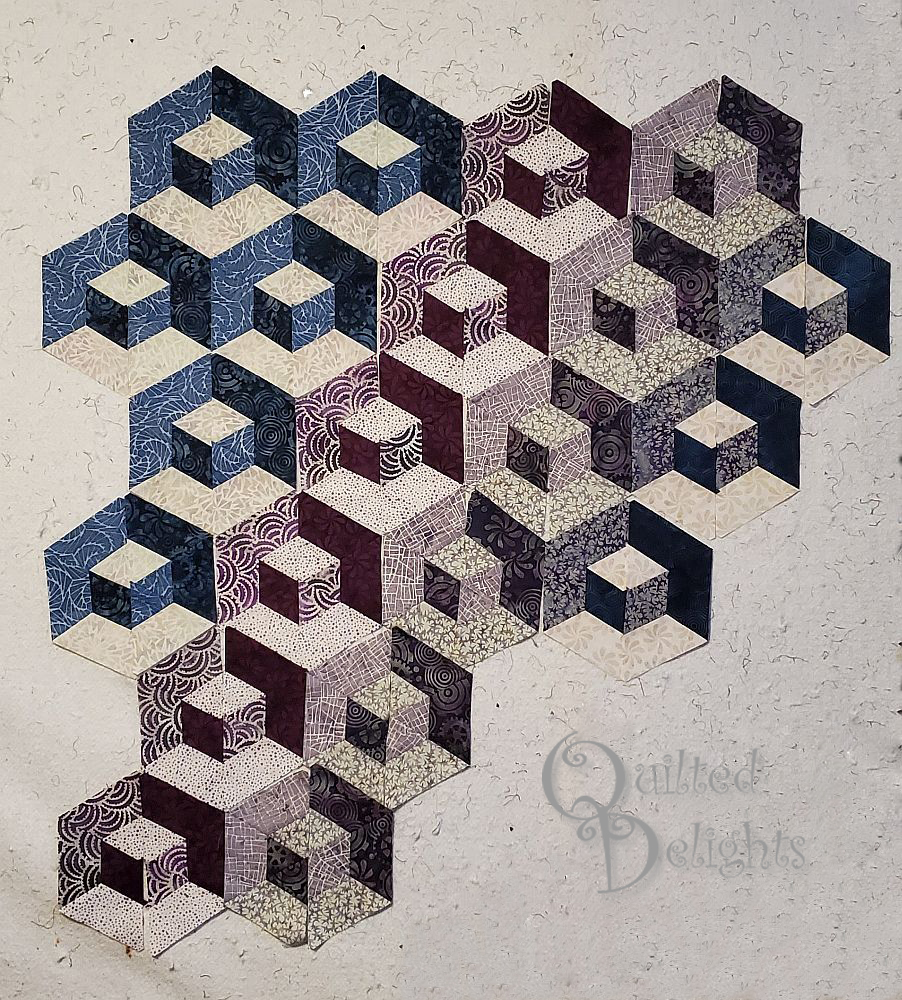
I call it Diamond Bars.

There are twelve different red fabrics in this one.
I used my 9 inch Creative Grid equilateral ruler to cut out all my triangles and angled strips.

The quilt has two different type triangles, one with a small inner white triangle and one with a large inner red triangle.  There are 36 of each.  I came up with 36  because that is exactly how many small white triangles I got from two 2.5 inch strips.  These are surrounded by 2 inch red strips.

I used yardage and fat quarters for the inner red triangles and cut four inch strips to cut the larger red triangles.  They are surrounded by 1.5 inch white strips.


They layout came about because of my need to have things be symmetrical.  I originally had all the outer red stripped triangles facing up, but that left a red bar at the bottom and not one at the top, so I started flipping rows around and came up with this layout.

I was fun to fiddle around with different triangle sizes and the layout to come up with this design.
This would be cool in scraps or rainbow color as well.  


The top was pretty quick to sew up once everything was cut out.
It Measures approximately 44 x 60.


I also played around with more red fabric and used the Pixie Basket Tutorial by Fabric Mutt.  
These are super cute and the perfect size to hold a bag of Valentine Chocolates.
These sew together lickety split!


Thanks for stopping by to check out my creations.

Make sure to check out all the other red creations today!

February 19th


Happy Quilting!
=^..^=

Monday, February 10, 2020

Island Batik Log Cabin Blog Hop

Hey all Welcome to the first day of the Island Batik Blog hop!


This week is all about log Cabins and I get to show of the Ancient Etchings fabric line by Jackie Kunkel of Canton Village Quilt Works for Island Batik.


I am usually one of the ambassadors who post my creations near the end of the month, but now you get to see me at the beginning!  Which means I do have a couple more seams to sew together before I quilt it this one, but it is still looking good!


I went with two different log cabins and mixed them together.  
The courthouse steps and the twisted log cabin.  


These colors are perfect for log cabins and are right up my ally with colorfulness!  And I really love the black turtle etchings in this line.  The extra two yards sent to me in my January box was perfect for the sashing and the borders.


I sewed these lovely fabrics together Schmetz Needles.  One of Island Batik Partners this year. 
I love these Needles. They are fantastic and I have been using them for years.


These fabrics are hitting your shops now so go check them out!  And check out Sharon Riley today.  She too is also showing off some Ancient Etchings!

If you need to find a shop in your area that carries Island Batik, check out the Store Locator at the Island Batik website.  

I am giving away some of my left over Ancient Etchings!  If you want a chance to win some 5 inch strips left over from my project leave a comment below and tell me what log cabin block is your favorite.


Update - I added another strip of the black fabrics for a total of 12 strips and rolled them up all Island Batik Stash Builder style.

Don't they look spiffy! I'll draw a random winner when the blog hop ends!


Also check out the Island Batik blog, they are giving a way some 
some precuts of Ancient Etchings as well.


Happy Quilting!


=^..^=


Friday, January 31, 2020

Let's Get Scrappy - January Island Batik Challenge

I am super excited to be an ambassador for Island Batik again in 2020!
On Monday I showed off all the goodies Island Batik and their partners sent me to work with and today I want to show you my first finished Island Batik Quilt of 2020.


The January challenge of 2020 is "Let's Get Scrappy".
Good thing there is 31 days this month.
I worked on this a little bit at a time all month and put the last stitch in the binding last night.


I love scrappy quilts and definitely have lots of Island Batik scraps to play with.  When I first saw the theme, I was envisioning a rainbow of scrappiness for this project with some possible stars or paper pieced diamonds and then....


I came across these cute little turtles Turtle Tots by Southwind Designs at the Loving Stitches quilt shop in Fayetteville, NC! The shop had the table runner version hanging on their wall and I immediately wanted to have the pattern.  I asked one of the ladies who worked there and she showed me a whole display of  Southwind Design patterns, but they didn't have the Turtle Tots in stock.  Ack!  I did end buying two others though.


When I got home I went to the SouthWind Design website and luckily they had the Turtle Tots pattern in stock, so I got the pattern!


These little guys are perfect for small scraps.


I cut the shell pieces from a left over 2.5 strip but you can also cut them from charm square scraps.


The head and legs also came from a left over 2.5 inch strip.


The pattern calls for 5 Turtle Tots, but I made six and altered the layout a bit to get the 6th one to fit.


What I really like about this pattern is that it has curves without having to sew curves. The process is similar to making a Cathedral Windows quilt by folding the fabric back on the bias to create the curve and stitching that down.


I used left over scraps form some Island Batik strip sets to make the water sections as well and I quilted it using White and Teal 50wt Aurifil Thread from their color builder collections.


The quilt measures approximately 50 x 40.


The only thing that wasn't scrappy was the white background.  For that I used Island Batik Neutral called Sprinkles.  It looks white far a way, but when you get a little closer you can see light gray dotted swirls.  It is one of my favorite neutrals!


I hope you enjoyed seeing my scrappy Turtle Tots and if you want to make some for your own or just want to see what other curvy patterns they have check out Southwind Designs they has some cute curved patterns.

And check out Island Batik and Aurfil websites. They are so colorful and full of inspiration.


=^..^=


Monday, January 27, 2020

Island Batik Ambassador for 2020!

Hey all,  I am excited to officially announce I get to be an Island Batik Ambassador again for 2020!


My fellow ambassadors have been showing off all the wonderful fabrics and tools they get to play with this year and today is my turn to show off what came in my Island Batik Box. Check it out.  These Fabrics will be used for projects for the first half of the year.


Stay tuned later this week I will show off my first project using some Island Batik Scraps.

And follow along with the other ambassadors this year to be inspired with all things Island Batik!


Carolina Asmussen ~ Carolina Asmussen Designs
Megan Best ~ Best Quilter
Pamela Boatright ~ Pamelaquilts
Jennifer Fulton ~ The Inquiring Quilter
Vasudha Govindan ~ Storied Quilts

Joanne Hart ~ Unicorn Harts
Mania Hatziioannidi ~ Mania For Quilts
Carla Henton ~ Creatin’ in the Sticks
Connie Kauffman ~ Kauffman Designs
Emily Leachman ~ The Darling Dogwood

Denise Looney ~ For The Love Of Geese
Leah Malasky ~ Quilted Delights
Sally Manke ~ Sally Manke, Fiber Artist
Maryellen McAuliffe ~ Mary Mack Made Mine
Carol Moellers ~ Carol Moellers Designs

Gail Renna ~ Quilt Haven Threads
Sharon Riley ~ Sew Riley Designs
Michelle Roberts ~ Creative Blonde
Gail Sheppard ~ Quilting Gail
Jennifer Strauser ~ Dizzy Quilter

Jennifer Thomas ~ Curlicue Creations
Alison Vermilya ~ Little Bunny Quilts
Sandra Walker ~ mmm! quilts
Suzy Webster ~ Websterquilt
Janet Yamamoto ~ Whispers of Yore


Happy Quilting!


=^..^=

Tuesday, January 21, 2020

The Winter Blues Blog Hop


Welcome to day two of the Winter Blues Blog Hop hosted by Carla of Creatin in the Sticks. For the next few days you can fight off those winter blues by hopping from blog to blog viewing some fantastic blue creations.


Today I am showing off my dutchman's puzzle quilt top done in blues and white.

For the flying geese in each block I used leftover 2.5 inch strips from an older Island Batik strip set and I used solid white Island Batik fabric for the background.


Leftover strips are perfect for making flying geese and this little quilt has 72 of them.

  Each block is made up of 8 flying geese. I sewed them together in sets of 4 and they actually sewed up pretty quick.  The quilt top finished out around 41 inch square.

Now I just need to quilt it up and it will be on its way to a sweet little boy.

Make sure to check out the other hoppers today to see what they came up with to fight off the winter blues.

Tuesday, January 21st

Tuesday, December 31, 2019

3D Island Batik December Challenge - 3D Cubes

The Island Batik Ambassador challenge for December is to explore the world of 3D. We could use any method to make our quilts pop into life!


I went with with color play and regular piecing to create 3D cubes.


I have made two of these in the past for mini quilt swaps and they are easier than they look to put together. The other two I made were small versions and done in rainbow colors. This is my first big version done in similar colors and I am loving it!


This quilt does not have any Y seams that is one of the reasons it goes together so quick and easy. If you want to make one, the hardest part is probably choosing the different shades of fabrics to use. Once that is done, it's straight line sewing to create triangles and half hexagons.


To make one, each cube needs three shades of fabric: a light, medium, and a dark. I used 12 fat quarters from the Island Batik collection Steam Engine by Kathy Engle for Studio 180 Designs. These came in my second Ambassador box. I love these purples and blues. If you love them too you can pick some up in shops right now!


When picking out colors, make sure each shade has enough contrast compared to its counterpart. If the light and dark or dark and medium are too close they will blend together and from a distance the quilt will look more like flat diamonds instead of 3D cubes. The light and medium set in the top left of the photo was cutting it close, but when I laid them out and tested them, I could still see the 3D cubes so I went with it.


To make the quilt I started with 2 1/2 inch strips to cut my triangle and half hexafon pieces.


To make one cube you need 2 half hexagons and 2 triangles from each of the three colorways. I used the Hex N More Ruler from Jaybird Quilts to cut mine out, but you can use any tool that will help you cut half hexagons and 60 degree triangles from a strip.


To create the two toned triangles, take a half hexagon and pair it with a triangle from one of the other tones and sew them together. For example, If I start with the two light half hexagons, I will sew a medium triangle on one and a dark triangle on the other. This step goes pretty quick if you string piece them all together.


Sew all the light half hexagons and then go on to the medium half hexagons adding triangles to those and then finish up with the dark half hexagons.


Take the six triangles and lay them out into a hexagon making sure the lights and mediums and darks touch. I pick which way I want the shadow to face and then lay out the triangles that way.


Only sew half of that hexagon together. This way prevents having to sew Y seams. This method is just like creating a One Block Wonder quilt, if you have ever done those.


I sew two triangles together then add the third one.


Again, only sew half the Hexagons, do not sew the two halves together.


Once all the halves are sewn, lay out all the cubes to whatever design you like. I added some side half hexagons to fill out the sides in my version.


Sew the half hexagons together by rows based on the layout. Once all the rows are done, sew those together to make the top. This part is easy sewing but gets a little time consuming to pin and match all the points to make sure everything lines up right.


I used Hobbs Tuscany Cotton Wool batting. It quilted up fantastic!


I enjoyed slowing down with this quilt and enjoyed the process, watching each block and row come together to create the 3D illusion.

This quilt measures 40 x 54. It's a nice lap size.


This is also my fourth finish for the final quarter of the 2019 Finish-A-Long.
You can see my whole ambitious list here.


=^..^=