Thursday, September 8, 2016

Rainbow Mini Swap - Round 2

The next swap I mailed out this year was my Rainbow Round 2 Mini.
I didn't participate in round one because it happened before I started swapping minis on Instagram.
But I was definitely happy to be a part of round 2.
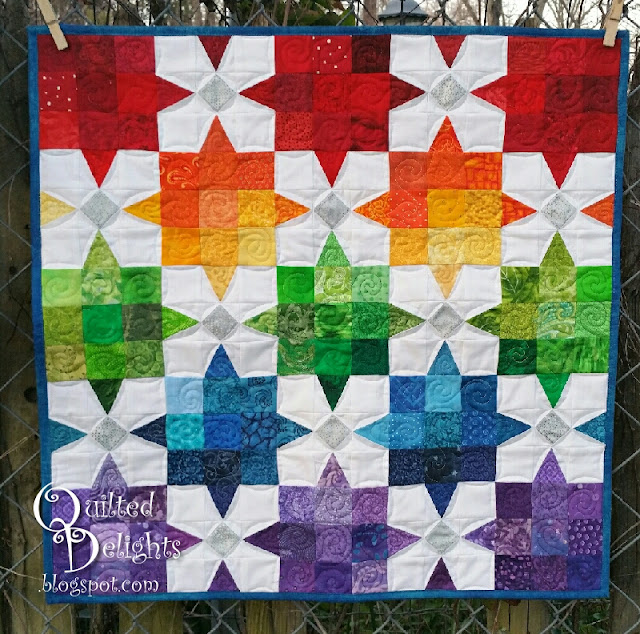
I found a perfect quilt online, but was unable to find the actual pattern, so I recreated it in EQ7.
I was also able to make it the right size for the swap.


I pulled rainbow colors from my scrap bins and did some paper piecing to get my points perfect.


I was really excited how the colors were coming together and started sewing the rows together. When I got to the point pictured above I realized I forgot to add the white corners to each of the colored nine patches to give the quilt it's illusion of circles.

Instead of taking everything apart I decided to skip the white corner pieces and quilted it up the way it was.

The finished Rainbow mini.


And this is the mini I received from my partner.
A fun unique take on the theme.

Stay tuned for more minis.

=^..^=

Monday, August 29, 2016

Tula JayBird Mini

This was a fun swap.  You had to use Tula Pink Fabrics as your main fabrics along with any Jaybird Mini Quilt Pattern.  
With so many combinations available it was hard to choose, but after much deliberation I chose an Eden Charm pack and the Tiny Dancer pattern. I bought the Mini Hex N More ruler to go with it, which I ended up using for my skinny mini swap as well.


Working on a layout.

I ended up with my lone yellow pinwheel in the center,
followed by the greens, purples, and then reds.


All quilted up and ready to ship out. 


Stay tuned for more minis!

=^..^=


Saturday, August 27, 2016

Skinny Mini - Quilt Swap

Time for a blog update!  My last post was at the beginning of February and I have lots of mini quilts to show you!  Today I will start with my Skinny Mini.

This was the second mini quilt swap I mailed out.  It was called Skinny Mini and the quilt had to be less than 8 inches wide and at least 20 inches long.  
While I was working with Jaybird Quilt's mini Hex N More ruler for another mini swap, inspiration struck for this optical illusion cubed quilt.


I pulled all the colors from my scrap bin.  Love my wonder clips!
They kept everything organized for me.


 And worked mostly at night to whip  this one up.


Here is the real sewing room during production.  I have several projects going at once.  I do believe I suffer from quilters ADD.  I had to set up another flannel board for my layout process since my regular design wall was preoccupied with a regular size quilt.

Here she is all finished!  Some of the blocks didn't contrast as much as I expected and  didn't  give the 3-D pop I was looking for.  To fix that I ended up coloring over them with a crayon to get the shade I needed.

Unfortunately my partner never sent me a return quilt.  :(  
I was a little bummed about that, but have now become more picky with the swaps I join.  There are several Swap mama's who run a tight ship.  If you don't participate and show updates they boot you out.  That may seem harsh to some, but I when I join these swaps I always get a good partner.

Stay tuned for more mini updates!


=^..^=

Sunday, February 7, 2016

Project Quilting Week Three: All About That Thread

The theme for week three of Project Quilting is "All About that Thread".

I decided to go small this week after my huge bed size quilt last week.  
It made for a more relaxing week and I still got to participate even though I spent three days at the hospital with my son while he had his appendix removed.  We came home Saturday afternoon and I finished up my project while my son recovered on the couch.  He is recovering well thank goodness, which gave me time to finish up this mini quilt.


The Unicorn pattern is from www.robynieland.com.
I first saw it on Instagram (https://www.instagram.com/crookedwhimsy/) and wanted to make one of my very own. I used a black background so I could show off some thread work for this weeks theme.

It measures 21 x 21 inches.

I used all brands of thread: Aurifil, Gutermann, Sulky, and Connecting Threads.

It was fun to paint my background with thread.  
My son said it looked like a cool drawing instead of quilting.

Check out all the fabulous entries and vote for your favorite here:
 http://www.persimondreams.blogspot.ca/2016/02/thread-challengetime-to-vote.html

=^..^=


Sunday, January 24, 2016

Project Quilting 7 Week Two: Seasons

What a week!  Every spare minute was spent at the machine. Early mornings, late evenings, during lunch breaks and into the wee hours of the morning... all to complete this quilt from start to finish in just one week !

Every time I close my eyes now I see snowflake parts.


This is for week two of Project Quilting 7.
The theme this week was "Seasons"

I opted to do one season.  
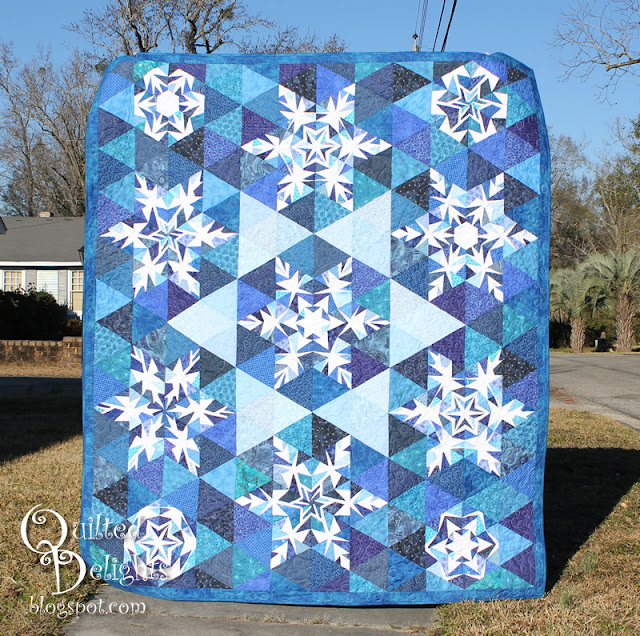
Autumn is my favorite season, but I was in the mood for something wintry, and wanted to work in blues.  While perusing the internet for inspiration ideas, I came across this pattern from Quilter Maker Magazine and knew I wanted to have one of my very own.


I couldn't resit making the whole quilt.
I was originally going to make one snowflake and make a table topper,
but I just kept piecing snowflakes like a mad woman!


This beauty measures 67 x 77.
I am in love with it.


I am going to call it  "Snow and Ice"


I'm definitely going to go smaller next week.  It was a huge challenge to get this one done in a week.  And I missed being able to stop and stare and take in the progress as I went.  There just wasn't time for staring.  If that sewing machine wasn't humming along I was getting behind.

When I first started quilting years ago I wanted to have a finished product ASAP! but now I notice I spend more time stopping and admiring the project as it develops.  I really do enjoy the whole quilting process from start to finish.

Make sure you check out all the other fabulous "Seasons" quilts.  Lots of great work went on this week,  You can vote for 6 of your favorites HERE.


=^..^=

Sunday, January 17, 2016

One Block Wonder Finished

Finished this one up this afternoon. I started it in 2014 when I saw Carla make one very similar during Season 5 of project quilting and wanted to have one of my very own.  


 What put a fire under my sewing machine was my son Jacob.  He asked me if I could get him a tapestry to hang on his dorm at school like some of the other kids.  He wanted something that would make his room feel more like a room instead of a boring space with four cinder block walls.


I told him I didn't have a tapestry, but I could make him something just as good.
I pulled out my triangles and asked him to put them on the design board in a layout he liked and I would sew it up for him.  He choose blue fading into red.  He said it was like the Force on one side and the Dark Side on the other.  


This is the original fabric I used to make all the blocks.


My quilt holders keeping warm during the photo shoot.    It was only 45 degrees, but there was a cold wind blowing and Daniel was in his shorts so he wrapped himself up like a burrito.


These are so fun to make.  I love seeing all the different blocks you can get from one piece of fabric.  They should call these quilts One Fabric Wonders!


This one was also on my list for the first quarter of the 2016 Finish-A-Long!
Yay! Finally a finished UFO to cross off the list!!


=^..^=

Sunday, January 10, 2016

Project Quilting Season 7: Week 1 - Confetti


Project Quilting Season 7
Theme: Confetti

A lot of 1/2 inches squares.  1/4 inch sashing.  Measures 20 by 28 inches.


You can VOTE HERE for your favorite project for week one of Season 7.

These next Photos I want to share are from my cell phone. Most were taken very late at night or in the early morning before the sun came up so the lighting isn't great, but they tell a great story of the quilt's Creation.

The idea for the quilt formed gradually. I definitely wanted to use tiny pieces so I settled on that pretty quick. I contemplated using small pieces to make a mosaic picture but I didn't want to have a lot of raw edges.  Then I thought about making a quilt that looked like confetti had landed on it, but dismissed that idea because I wanted to create something more organized.  But confetti isn't organized so I was stumped. In my mind I threw a handful of confetti and watched  it fall trying to come up with an idea. My mind drifted to a piece of artwork my daughter made with crayons and a blow dryer. I knew right then I wanted to create a fabric Version of her piece.
I grabbed my colored scraps and cut 792 one inch sqaures.

Some colors I didn't have enough scraps so I cut a one inch strip from my yardage.


I sewed all the squares to a thin Strip of white and re-trimmed them all.

Next came the creating of Rows.

I always have a kitty Close by.


At this point I really loved the look of the rectangles of color.
I think I might try another Rainbow quilt with rectangles in the future.

The back was looking pretty spiffy.

I paused the the sewing of Rows to get the perfect placement of my Couple.

Back side of the finished top.

Closer view of the back.

I put a sheet of wonder under with black fabic on it in the printer and printed out my couple. I was excited about how well it printed out that I forgot to take a photo of that step.

After the couple was trimmed and ironed on, it was time for quilting vertical lines.
I finished at 11:00 pm Saturday night and took an outside phot this morning.

Trimmed, bound, and completed in one week! Think I'll name it "New Year's Kiss"


Make sure you check out all the other entries at the voting link above!

=^..^=