Showing posts sorted by relevance for query diamond bars. Sort by date Show all posts

Thursday, February 19, 2026

Meander Quilting & 4 Fast Finishes! TGIFF


I am happy to be hosting TGIFF this week and to show off my four latest finishes!


The past year I have been working on shortening my UFO list by sewing at least 15 minutes a day on my UFOs.  I had been working on a One Block Wonder UFO, but didn't have the right fabric I wanted for the  border,  so while I waited for that to come in I worked on four quick finishes.  

The first finish was my Diamond Bars quilt that I started in February of 2020 when I was playing along with the Color it Red Blog Hop.  I made the top for the hop, but never got it quilted. I spent so long trying to decide how to custom quilt it that it never got done.  In the end I decided to do some all over meander heart quilting and it turned out perfect!  If you want to make your own I have some simple instructions on this blog post:  Diamond Bars Instructions


I still had more UFO sewing time that week so I put another small quilt top on the frame.  This top came about when I made some other samples for my Brick Windows Quilt Tutorial.  It is a quick quilt that showcases fun novelty prints, the ones that are too cute to cut up into small pieces.  This top came about as I made samples of what the quilt would look like in a different color ways. I enjoy showcasing different color variations in my tutorials, especially when the quilt tops come together so quickly.

If you want to see how fast it is to make, you can view the video here:


With those two quilts done I decided to keep going and added another small quilt top the quilt frame.


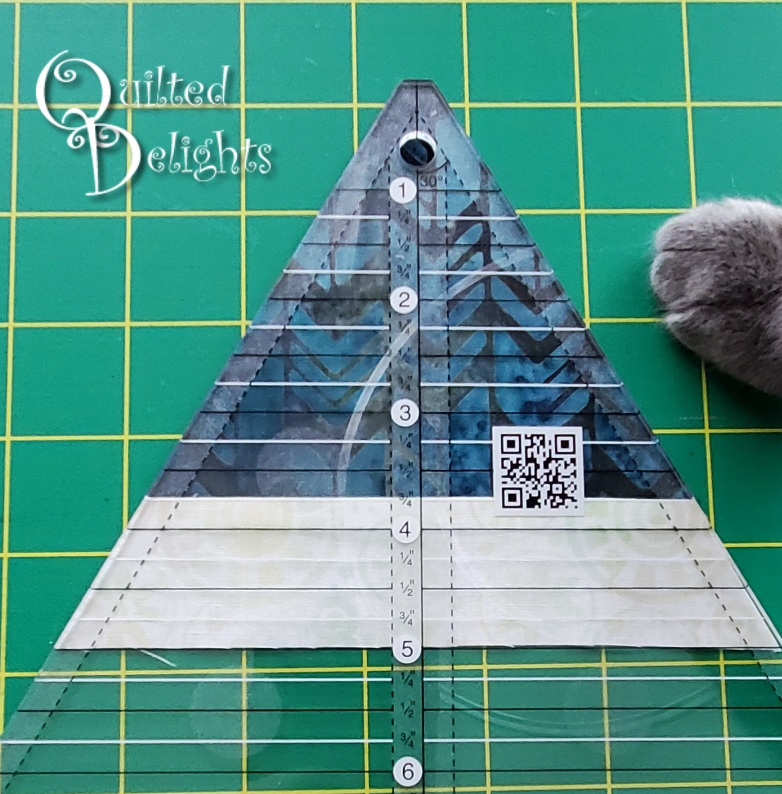
  This time a flowery butterfly version of my Baby Geo quilt.  This is Another quick baby quilt and is a fun quilt to introduce new quilters to sewing with Triangles.  It is another color way from the main version, but has a border added as well to make it slightly bigger than the original. 

Click the image below to see how to make this quilt and to see it in color ways.


With those three done I still had a few more days left in my week for UFO sewing and since these small quilts were quilting up in under an hour, so I decided to do one more.  Another Brick Windows version.


A Pokémon version!  I have some Pokémon lovers in my life and couldn't pass up this fabric when I saw it, but I wasn't sure what I would do with it till I came up with my Brick Windows quilt pattern.  It fit the center squares perfectly.  With this one quilted up, I now have all the Brick Window quilts from my YouTube video quilted.  No more UFOs left over from that video project.

It sure feels good to have these four finishes off the UFO list.  

If you want to see more pictures or to hear more about my process on getting these four quilts done,  check out my most recent YouTube video on my UFO progress:


This is my second year documenting my UFO progress on YouTube. I started in 2025, completed the entire year, and decided to continue in 2026 so I can knock even more UFOs off my long list. If you would like to follow along with my weekly progress, check out my YouTube channel, Quilted Delights. I usually share my progress videos on Wednesdays.

Do you have a finish you want to show off?  If so add your post to the link party below.


You are invited to the Inlinkz link party!

Click here to enter


Happy Sewing!


=^..^=


Follow me on Instagram
Check me out on YouTube.

Monday, June 29, 2020

June Challenge - Island Batik Ambassador


June was a free theme for Island Batik Ambassadors.  That meant we could make anything we wanted!  I knew I better decide on a project fast, otherwise I would dilly dally with a hundred different ideas and end up rushing at the last minute to finish one.  


This quilt came about from a comment made by one of my young friends, Christopher. It was a comment he made on my fabric giveaway post last month on Instagram. To enter the giveaway you had to leave a comment about what you would make if you won the fabric. Christopher commented, "I'll keep it and ask my friend's mom to make me something memorable for my apartment during/after college."

Of course his friend's mom is me. Well, the random generator didn't pick Christopher's comment, but I could not pass up this opportunity to make him a quilt, particularly since I already knew what fabric colors he liked!

The fabric line is River Valley designed by Kathy Engle for Deb Tucker’s Studio 180 Design.
Island Batik had given me plenty of fabric for my May Challenge so I had enough left over to make something for Christopher. I just needed to find a pattern that fit the amount of fabric I had left.

I asked my son if Christopher would like triangles. He said, "Sure. I think he would like anything you made." So I decided to recreate the Diamond Bar quilt I made in February using River Valley.


This quilt is made using two different triangle blocks.  One with a large colored triangle center surrounded by neutral bars, and one with a small neutral colored triangle surrounded by colored bars. 
These are similar to making log cabins, but with triangles instead of squares.

Below are the measurements I used for cutting my triangles.  If you want to make your own you can use your favorite 60 degree ruler to cut your peices.

Triangle A: 
Colored Center
Using a 60 degree  ruler, cut 36 triangles from a colorful 4 inch strip.
Using neutral fabrics cut 1 1/2 inch strips. Line up the 5 inch mark on the triangle ruler with the bottom of the 1 1/2 fabric strip and cut out 36 bottom bars. Do the same, lining up the ruler on the on the 6 inch and 7 inch line and cut 36 pieces of each.

Triangle B: Neutral Center
Using a 60 degree ruler, cut 36 triangles from a neutral 2 1/2 inch strip.
Cut the outer bars from 2 inch colored strips.  Use the 4, 5 1/2, and 7 inch markings on the triangle ruler to cut 36 each colorful bars . Cut 36 of each size.  Or you can sew and trim each section one triangle at a time.

I used the off white fabric I had left from River Valley and then supplemented the rest with Whip Cream from Island Batik's Foundation fabrics.  Whip Cream is perfect for River Valley since it has very subtle hues of green and blue.


I cut all the pieces out and sewed a little on it several days throughout June. Some days it was just 15 minutes a day, but progress was made each time. This past weekend, I finished it up.


For the quilting I wanted a color that would show well on all the different fabrics.  I didn't want white, because that would be too bright on the dark fabrics, and a dark blue thread would be too harsh on the whites and creams, so I went with this beautiful aqua color from Aurifil.  It blended perfect on all the fabrics.


I quilted it using Hobbs Natural Cotton Batting. I had a bag of leftover batting and pulled out a piece that was wide enough, but not long enough, so I pulled out another piece to see if it was wide enough to piece together and low and behold it was the perfect size! No piecing batting together this time. Yay!


And of course I used Schmetz Needles. They never disappoint.


The orignal quilt I made had white edges, but I decided to change that up a bit for this one and went with a printed border.  

Hope you enjoyed this quick quilt.  Be sure to check out all the other Island Batik Ambasadors to see what they have been playing with this month.


Now I need to give Christopher a call,  and let him know he has a new quilt to pick up.


=^..^=

Wednesday, February 19, 2020

Color it Red Blog Hop

Welcome to my day of the Color It Red Blog Hop!  Hosted by Carol of Just Let Me Quilt.

All we had to do to play along was make a project that had red in it.
Today I am showing off what I made with some of my favorite shades from my stash.


I call it Diamond Bars.

There are twelve different red fabrics in this one.
I used my 9 inch Creative Grid equilateral ruler to cut out all my triangles and angled strips.

The quilt has two different type triangles, one with a small inner white triangle and one with a large inner red triangle.  There are 36 of each.  I came up with 36  because that is exactly how many small white triangles I got from two 2.5 inch strips.  These are surrounded by 2 inch red strips.

I used yardage and fat quarters for the inner red triangles and cut four inch strips to cut the larger red triangles.  They are surrounded by 1.5 inch white strips.


They layout came about because of my need to have things be symmetrical.  I originally had all the outer red stripped triangles facing up, but that left a red bar at the bottom and not one at the top, so I started flipping rows around and came up with this layout.

I was fun to fiddle around with different triangle sizes and the layout to come up with this design.
This would be cool in scraps or rainbow color as well.  


The top was pretty quick to sew up once everything was cut out.
It Measures approximately 44 x 60.


I also played around with more red fabric and used the Pixie Basket Tutorial by Fabric Mutt.  
These are super cute and the perfect size to hold a bag of Valentine Chocolates.
These sew together lickety split!


Thanks for stopping by to check out my creations.

Make sure to check out all the other red creations today!

February 19th


Happy Quilting!
=^..^=