Monday, February 27, 2023

Island Batik All Puffed Up Blog Hop


Welcome to the final day of the Island Batik "All Puffed Up" Blog hop.  


Today, Connie, of Kauffman Designs, and I get to show off our creations using Sunshine Garden, the new Island Batik fabric line by Kathy Engle for Terri Vanden Bosch of Lizard Creek Quilting.


This line is so bright and fun, right up my alley!  It has fun vegetable and seed packet prints in some of my favorite shades.  And strawberries.  You can never go wrong with a strawberry print.

Sunshine Garden is arriving in shops now. You can find it today in these shops today:


I made puff quilts years ago, and lots of them. 2000 was the year of puff quilts for me. I made some for family and friends and even sold a few online. I even made triangle shaped puffs and a velvet puffed baby set.  By the middle of 2001 I decided I was tired of stuffing puffs under the machine and made my last one. I said I would never make another one.  


Fast forward 22 years later, I saw all the fantastic puff quilts popping up on Instagram for the Ombre Puff Quilt Sew along. Some of the layouts were so bright and fun. For half a second I contemplated making another one, but I quickly told myself, "No". I was happy to enjoy the beautiful work from afar.


Fast forward a few more months....here I am making another puff quilt for the Island Batik Ambassador February challenge.  I wasn't too excited when I first saw the theme, but I'm a trooper, so I got to designing and decided I would try a new method of construction this time around to make things more enjoyable.


Using my old method, I ended up with long tubes to stuff and seal up.  I would stuff each row and then sew down the column sealing those squares, then do it again till I got to the last column. This meant I was pushing and pulling fabric for each row repeatedly till I got to the last column.  The bulk was not always fun to handle under the machine. 


I didn't want to do that this time, so I opted for the individual puffs method, 195 puffs to be exact. This made it much easier to handle under the machine. There are more seams and more fabric this way, as well as the final step to tack down each puffed square to the back, but as far as time to make it, I'd probably probably say it evens out since I spent less time pushing and pulling the stuffing and fabric and I didn't have to get the broom handle out to stuff the puffs at the end of the tube.


The quilt did shrink considerably though out the process.
I started with 5 inch blocks.


After they were sewn to their muslin backs they became 4.5 inch blocks.


After they were sewn together in rows they became 4 inch blocks.


After they got some poly fil in them they scrunched up a bit more and the whole row shrunk about 4 more inches.


I did enjoy this method a little more.  I only had fabric on the left side of the machine when closing the squares instead of fabric on both sides of the machine.  It was much nicer.


I also wanted to try something other than than plain squares this time around, so I tried out a version of the square in a square block.  I left more fabric around the edge of the first square though so it wouldn't get lost in the pleating.


Here is what the back looked like before adding the official backing.


Already cat tested and approved even before I finished puffing the last row.


I wasn't sure I could put a puff quilt on a long arm, but I wasn't about to floor baste (another thing I said I would never do again).  So I gave it a shot.  It worked out pretty good and I was able to tack between each puff with a plus sign.  


I did add a layer of scrap batting between the puffs and the back fabric. Some of the joining seams felt a little hard, so I wanted to soften it with some batting.  


I used some left over pieces of Hobbs Heirloom Premium Cotton Batting and put it between the puffs and the backing fabric.


I pieced and tacked it together with Schmetz needles.  Their chrome microtex 90/14 needle worked great and I didn't' have any issues tacking it on the longarm with these needles.


I opted for an Around the World style pattern for this one.
I like the extra center squares, they give it a unique look.


It is a heavy quilt with all that puffy stuff, three layers of fabric, and some batting.
 My son joked and said said it was easier to hold it this way.


I'll admit, I never pictured myself making another puff quilt, but I do like how this one turned out.  I might not make another big one, but the kitty liked it so much I could see myself making a small kitty sized version in the future.


One more picture just for fun.  


Happy Quilting!


=^..^=


Monday, February 20, 2023

Sweet on You Challenge - Cupcake Treat Bag

Welcome! Today I get to help kick off the "Sweet on You" challenge hop hosted by Joan of Moose Stash Quilting.


I've had this sweet cupcake fabric for some time. I originally used it for the back of a quilt and still had a little left over and wanted to up some for this challenge, so I turned it into a treat bag.


I found a fun paper pieced cupcake for the front. The pattern is from Joe June and Mae. She has lots of fun patterns, check her out!


This little drawstring bag is just the right size for a large bag of Lindor Truffles.
plus a few more extra sweets on the side!

Be sure to stop by the other blogs to see all the sweetness today!


 Monday Feb 20

MooseStashQuilting

Karrin's Crazy World

Quilted Delights  (me)

Selina Quilts

Sew Cute and Quirky

Days Filled With Joy

Scrapdash


Tuesday Feb 21

Vicki's Crafts and Quilting

Creatin' in the Sticks

Quilt Schmilt

Ms P Designs USA

The Crafty Grammie

Vroomans Quilts

Words and Stitches


Wednesday Feb 22

Elizabeth Coughlin Designs

Quilting Gail

Just Because Quilts

Bea Quilter

SameliasMum

Kathy's Kwilts and More

Lynns Blog


Thursday Feb 23

Just Let Me Quilt

crazy'boutquilts

Quiltery-For the Love of Geese

Pinker n' Punkin Quilting & Stitching

Inflorescence

Purring Cottage


Happy Quilting!


=^..^=


Sunday, February 19, 2023

Project Quilting 14.4 - A Novel Project: Harry Potter


The theme for week four of Project Quilting is "A Novel Project"
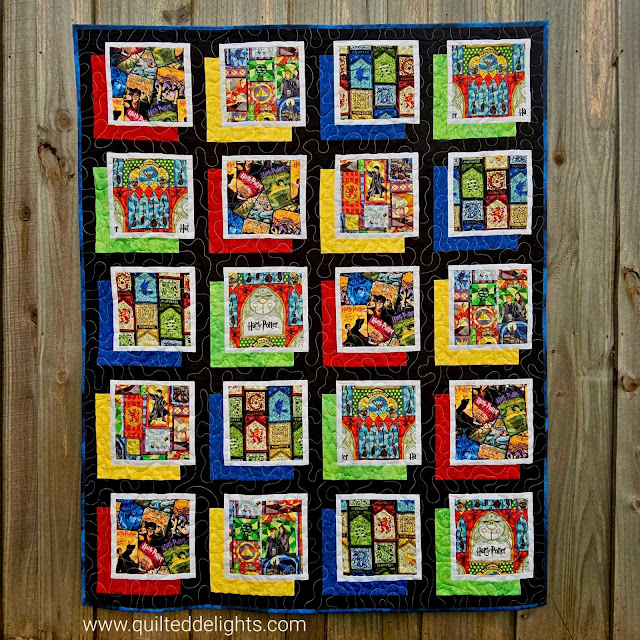
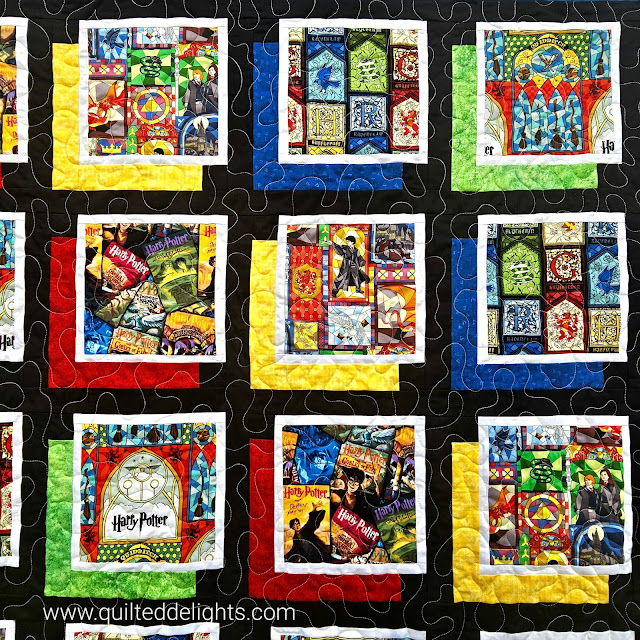
I have several favorite novels to choose from but when I saw the fabric with all the Harry Potter Book Jackets I knew I had to make a quilt with that.


I picked out a few more prints to go with it and cut out some big eight inch squares.


Boonky helped me cut out the black fabric for the sashing.


The shadows behind each print represent each of the house colors. 


And I couldn't pass up this print for the back.


I did a quick meandering for the quilting and put the binding on this morning.


This came together pretty quick since the blocks were big.  The thin white borders and shadows were quick too.  Add the sashing and the top was done and quilting was fast with the meandering. You can definitely make this quilt in a week or even in a weekend. particularly if you have a lot of time to sew on Saturday and Sunday.   

I need to make a few more of these for Harry Potter nights!

The Quilt measures approximately 48 x 59.


Head on over to Kim Lapcek's blog to see all the Novel Projects completed this week!


Happy Quilting!


=^..^=


Monday, January 30, 2023

Quilt for Joyce


I finished this quilt at the beginning of January, but was waiting for it to be delivered to its new owner before showing it off. 

At the end of December my neighbor asked if I could make a quilt for her sister's 80th birthday which was coming up in January.


I told her I didn't have time to make a brand new quilt from scratch, but if she'd be interested in one of my UFOs I could finish one of those for her and have it ready in time for her Sister' birthday.


She picked out this older UFO and asked if I could make it a little bigger and piece her sister's name at the top.  I told her no problem.  I took apart the blocks and added a two inch sashing between them.  I needed to undo the top right corner anyway because one of the blocks was sewn in sideways which was the reason this one became a UFO in the first place. It got put in time out and then stayed there.


This quilt originally started in 2016 as part of a bee hive swap.
The block is called Shine Bright by Ms. Midge Quilting.


I pieced the name and added two large pinwheels in each side to balance things out.  I did have a row of pinwheels on the very bottom of the quilt too, but that made the quilt way longer than it was wide, so I took those off. 

The pattern for the letters come from Wayne Kollingers Sketchbook. I made them six inches tall and they sewed up pretty quick.


I made some Frankenbatting from two big left over pieces of Hobbs Premium cotton batting and got to quilting.


There wasn't a lot of time for custom quilting so this one got a fast swirly meander.


I think it turned out pretty good and I got an old UFO checked off my list and the new owner loved it!


Happy Quilting!


=^..^=


Sunday, January 29, 2023

Valentine Heart Bargello


Another UFO off the list!


On Valentines day 2021 I decided I needed a big Valentines Day quilt. I had seen a little quilt like this on Pinterest, but I wanted mine to be a bit bigger, so I played around in EQ8 and came up with this.


I pulled fabric from of my Personal Island Batik stash and used the 2.5 AccuQuilt strip die to cut my strips.


I was given the 2.5 inch strip die with my Island Batik Ambassador box a couple years ago. Originally I had reservations about these strip dies....


I love all the their triangle and odd shape dies, but surely I could cut straight lines faster and with less waste on my own. But, as I was hand cutting strips without the die for another project, I realized every 4 or 5 strips I had to straighten my edge up again.  When cutting 60 strips that's a lot of waste. Probably the same if not more than what the edges of the die would produce.


I also realized I was spending the same amount of prep time I would be using with the AccuQuilt die as I was layered and stacked fabrics to rotary cut. Plus I only like to cut 4 layers at a time with a rotary cutter, more than that and things get wonky.


And sometimes my ruler would move ever so slightly and I'd shave off an extra 1/16 of fabric at the end of a strip. With the die I get perfect strips every time.


So with that other project I ended up debunking all my pre-conceived notions and have come to love using these strip dies, and I was excited to use it to cut out all the strips for this Heart Bargello.  


Once my strips were cut and sewn into a tube, I cut out the columns.


Next was the challenge of opening the tube a the right spot.
I would say this is the hardest part of making a Bargello quilt.  Making sure you break the tube at the correct color.  If you have somewhere to lay out the strips as you go it helps.


This one was put together in sections. So I had small strip panels to work with.


I completed the top in one week.  I started it on February 14, 2021 and the last border was added February 21, 2021.


I even got the backing pieced right away.  And then it sat while other projects took over.


Almost two years later I pulled it back out to finish it up.


I used the same quilting method as my last two bargellos.


But I did shake it up a bit on the white fabric.


Lookin good! Time to bind it!


This one started out so fast, but then stalled, so I am glad to finally have it finished and ready Valentines day 2023.


Happy Sewing!


=^..^=