Friday, May 31, 2019

Make It Modern with Island Batik and Hobbs Batting


This month's challenge for Island Batik Ambassadors was to make a modern quilt and use any of the Hobbs batting that was sent to us. 


 I went with the Hobbs Heirloom Natural Batting with Scrim Binder.  I love how this batting sticks to the batik fabric, I never have to worry about it bunching and puckering on the back while quilting.  


For this quilt, I really wanted to use the Snowberry Strip Set that was sent to me from Island Batik, but I had a hard time deciding on a pattern.  I couldn't decide if I wanted to go super modern with improv pieing and lots of negative space or just a tad modern with an altered traditional block. 

I really wanted something to show off all the fabrics.  I looked at all kinds of patterns on the internet (there were so many good ones to choose from) and even drew some of my own, but time kept ticking away and still couldn't settle on a pattern.  It was getting close to the end of the month and I hadn't even cut one strip for this project! Ack!

Is there a word for Excessive Quilter Pattern Choosing Indecisiveness??
If so I suffered from it big time this month.


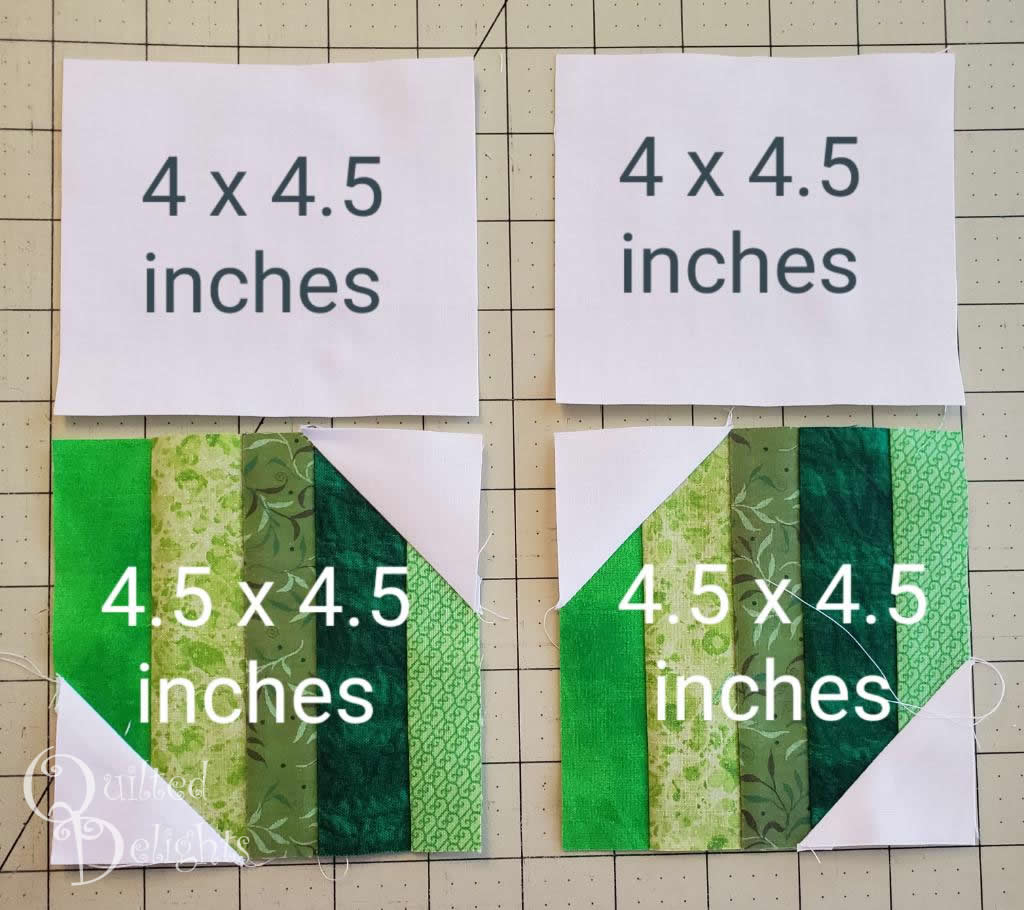
As the end of the month drew near, I ended up having to go with a pattern that could be sewn up in a couple of days so I went with my version of a Strip Tube Quilt.


I used all but the lighter colors from the strip set and added some of the gray mini dots yardage from the same Snowberry collection for the larger strips.  My Strip sets ended up being 6.5 inches wide.  This made nice size blocks, which made the quilt come together even quicker.


I am totally in love with this color scheme of Snowberry and the gray Aurifil thread I used for the quilting blended well with all the different colors of the fabric line. 


 The gray thread disappeared on the gray fabric and wasn't too over powering on the dark purples and blacks. It was the perfect color for this project.


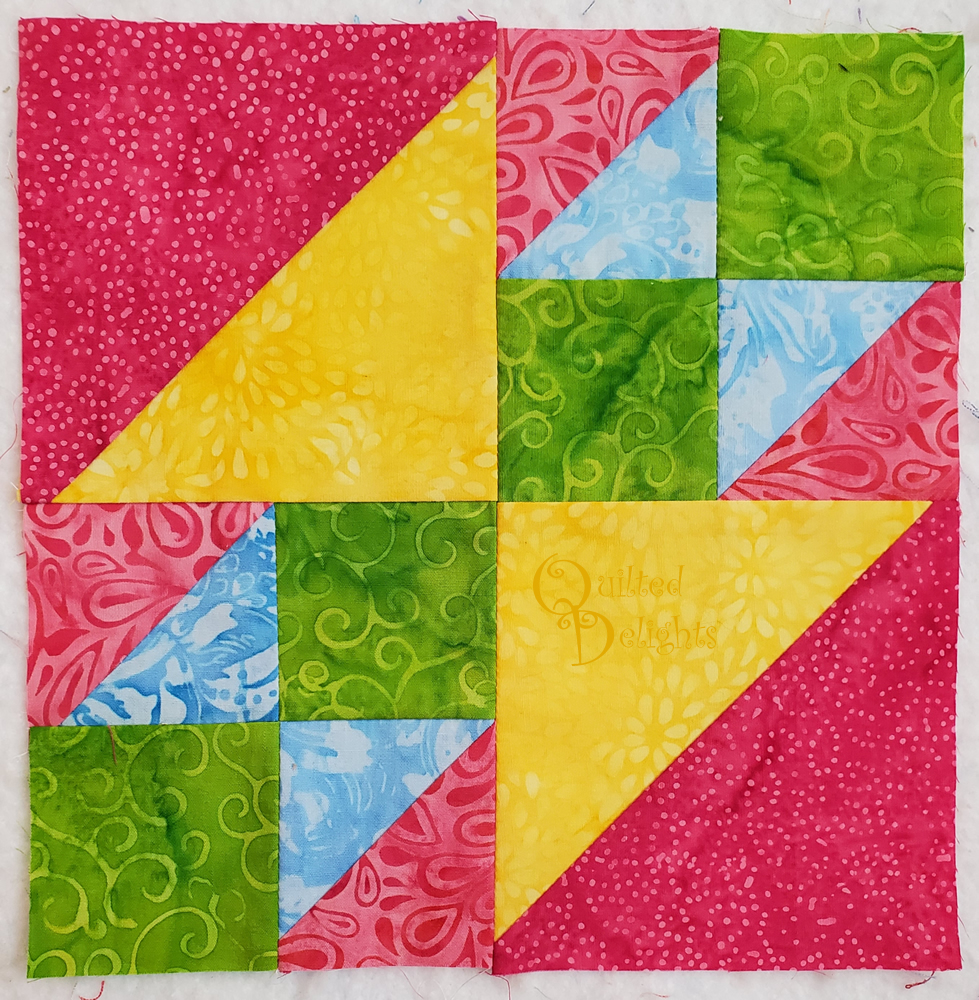
I like how the placement of the squares created some fractured square diamonds. 

This quick quilt has turned out to be one of my favorites.  I see different patterns depending on the angle it is placed.  It measures approximately 50 x 67


=^..^= 

Monday, April 22, 2019

Island Batik Ready. Set, Go! Baby Quilt with Accuquilt

I love bright colors, small pieces, and easy cutting and this baby quilt has all of that thanks to Island Batik and Accuquilt.  
   

The main challenge for the Island Batik Ambassadors this month was to use the Accuquilt Go system to cut out our project.


 Accuquilt graciously sent the 8 inch block bundle of the Ready. Set. Go! to the Island Batik Ambassadors this year.


The Ready. Set. Go! bundle comes with a book by Eleanor Burns that has instructions for making 46 different blocks using the dies that come in the bundle.


My quilt is made up from two blocks from the book: 

Old Maid's Puzzle


and Flying Birds


Each block was alternated and set on point in the quilt


EQ8 helped me get the layout and colors I wanted.

EQ8 Version

Final Version


I used the Stash builder rolls sent to me by Island Batik as a 2019 Ambassador along with some yardage for this little quilt.

I cut every single shape using the Accuquilt.
I used dies #2, #3, and #5 for the blocks and used die #4, the quarter square triangles, to get the smaller yellow and pink half square triangles for the sides of the quilt


 I love these half square triangle dies.

They cut perfect triangles every time with no dog ears, and they sew up perfect with no trimming down.  I am hooked on these dies!  I need one for every size HST!


I pieced together two small left over pieces of my Hobbs 80/20 batting for this one. I save all my leftover batting. Larger leftover pieces are perfect for smaller quilts.


I broke out my Aurfil Threads to quilt this one up. Patel yellow was used for the pink, green, and yellow fabrics and the blue went over the purples and blues.


The Auriful and the Hobbs combined sure made the quilting pop.


I got a break in the clouds for an outside picture at the park. I love the new park only two blocks from my house.  The trees are turning green and getting g fresh piles of mulch. Check out the pile put on that tree on the left.  You can never have too much mulch. Haha.


=^..^=

Sunday, March 31, 2019

Island Batik Vintage Reimagined - Jewel Box

For the March Island Batik Ambassador challenge, Vintage Re-imagined, I wanted to work with a vintage block that I could create using one of the Island Batik precuts I had and I also wanted a block that could showcase all the fabrics in the pack. 


I decided on the Jewel Box pattern.  I had a stack of 10 inch squares of Island Batik's Moroccan Bazaar I purchased last fall that was perfect for the "jewels". The other fabrics were provided to me by Island Batik for being an Island Batik Ambassador.  I used a full three yards of the solid black batik and half a yard of the Orange print for the binding.


The Jewel Box block is made up of a smaller four patch blocks. In the Encyclopedia of Quilt Blocks by Barbara Brackman this four patch block has many names, with one of them from dating back to 1884:


 Hour Glass

Railroad Crossing
World’s Fair 
Jacob’s Ladder 
Double Four Patch
New Four Patch (1884)
Buckeye Beauty
Going To Chicago.  


After doing some research on the internet I learned the name Jewel Box was popularized by Eleanor Burns in the late 1990’s.  The actual Jewel Box block is made up of four smaller blocks. By rotating them with the color of the HSTs on the corners it creates the Jewel Box block.


For this quilt I was able to use all but two of the 10 inch squares with very little waste. I cut the 10 inch square in half and used that half to get two 5 inch squares for my half square Triangles.
Then I cut the other half into two 2 2.25 x 10 inch strips to make the four patches. I cut the black background to match.   I needed 160 HSTs and 160 Four patches.


I laid out the HST and four patches on the design wall trying to make sure I didn't put the same fabric next to each other. I sewed a couple test blocks and then started sewing rows together in strips.


Hobbs Batting sent some fantastic 80/20 black batting to use as an Ambassadors so I tried it out on this project and it turned out great! My "jewels" are poppin'.  


Can you see the black batting in the above picture on the edge of the quilt? 
It blends right in with the 2.5 inch border. 


The quilt measures approximately 61 x 75.


If you want more vintage re-imagined inspiration check out the blogs of the other ambassadors.  You can find them all here: 2019 Island Batik Ambassadors


=^..^=

Tuesday, March 26, 2019

All About Strings Blog Hop - Spring Strings

Hey everyone and welcome to my day of the All About Strings Blog Hop hosted by Carla of Creatin' in the Sticks.


The Hop is running till Thursday, so make sure to follow along for some fabric String inspiration.
The full schedule is listed at the bottom of the page.


 It is officially Spring here. Flowers are blooming all around town and in honor of all the beautiful blooms and colors sprouting up...

I decided to go with a Springtime theme with my Strings.


 I am calling this one Spring Strings. It measures approximately 72 x 54 inches.


 These tulips are big blocks coming in at 11 1/4 x 21 inches and today I would like to share my tutorial on how I made them, but before we get into all that...


 I want to show off  another smaller string project I made for the hop.  A mini tuffet pin cushion.  Isn't it so cute! I have the pattern for the regular size tuffet but decided to start out with this mini one.  It was quick to put together with some of my batik strings and not as frightening as I imaged it would be.  I sewed it up in one evening. The pattern suggested spray painting the legs and I may do that once I figure out what color use.  

And now for the tutorial on the Tulip Block.

If you would like to make your own, start by picking fabric strings in your favorite color,
 or if you like, you can even make scrappy tulips.  My strings measured from 1.25 to 1.5 inches.


Create a 10 x 4.5 inch strip of your favorite strings.

The strip can be a wee bit longer than 10 inches if your strips are longer. No need to trim them to exactly 10 inches, we will trim later, but the width does needs to be trimmed to 4.5 inches. 

Clean up the right edge with your ruler and rotary cutter. 

Using a 45 degree ruler, cut off a triangle from the right edge. 

Make sure you leave 1/4 inch seam allowance on the right side.  This can be easily done with the "Easy Angle Ruler" or any ruler that helps you make flying geese.  I used the Flying Geese ruler by Mari Michell because it was close.  But you can also eyeball it.  Just be generous if you eyeball it.  It's easier to trim it down than cut a whole new piece.


Cut a 5 inch White Square, sub-cut it on the diagonal to get two white triangles.

(If your going to cut a lot, you can cut a 4.5 inch strip and used the "Easy Angle Ruler" to cut the triangles. That is what I did and why one end of my triangles has a notch at the top.)
Cut a 2.5 inch White Square.

Make a small 2.5 inch square from your strings.

Cut a 2.5 a 4.5 inch White Rectangle.

Angle the two pieces from the original string 10 inch strip set to form the base of the tulip.  Make sure all the strings are going the same direction.

Sew a white triangle to both the  angled edges of your larger string pieces.  Press.  Trim the smaller square to 4.5 inches. This creates a Half Square Triangle and will make one side of the tulip.

Trim the longer string strip to measure 8.5 x 4.5 inches. 

Sew the 2.5 inch String square together with the 2.5  inch white square.

Press and then sew the 4.5 x 2.5 inch white rectangle to the newly sewn String/White rectangle.  This creates the 4.5 inch square for the top of the tulip.

Sew the 4.5 inch top square of the tulip to the 4.5 inch half square triangle that makes up one side of the tulip.


You should now have two halves of the tulip.  Sew these two halves together.

If all has gone well you should now have a cute tulip block that measures 8 inch square.


Cut two 7 inch white squares, sub cut these on the diagonal to give you 4 triangles.

Or if you are cutting a lot like me you can use the easy angle ruler and cut a 6.5 inch strip and cut your triangles that way.


Sew these four white triangles to the tulip block. I sewed opposite sides first, then flipped the block and added the other two sides.


For the leaves, make a 10 inch strip of green strings, sub-cut to make two 4.5 inch squares.


Cut four 2 inch white squares.  Draw a line on these on the diagonal using your favorite method. I pressed mine in half with the iron to create a sewing line.

Align your two green squares side by side with the strings going vertical.  Place a white square in the upper right corner and lower left corner of the Left square.

Do the opposite for the right square, placing a white square in the upper left and lower right.

It is good idea to lay them out by your machine in the way you want to sew them.  This will save you time you don't want to spend with the seam ripper later.

Sew on the line you marked. I like to sew a thread's width on the side of the line towards the seam allowance.  This way my triangle won't shrink when I iron it out.

Trim off the excess fabric from each  each white corner by cutting 1/4 inches away from the seam.  Press.


Cut two 4 x 4.5 in white rectangles.

Align the 4.5 edges together and sew the white rectangles to the top of the leaf square.

Cut a 1 x 8 inch green strip.
Sew the leave sections to the strip.

This creates the stem.


Cut two 8 x 1 7/8 white strips.  Or you can cut them 8 x 2 and trim them down later.  Sew these to the sides of the leaf block.

Cut one 2.5 x 11.75 inch white strip.
Sew this to the bottom of the leaf block.


Sew the top of the tulip to the leaf section.

My unfinished tulip block measured  21.5 x 11.75.

Sewing with triangles always makes things tricky, so if the top of your tulip block comes out wider or smaller, just adjust the width of the white side strips on the leaf section to match the top of your tulip section. Then cut the length of the bottom 2.5 inch strip to match the width of the top of the tulip.


For even more inspiration, here are some throwback images to some of my previous string projects.
Almost all of them were made for Project Quilting.


The Marsh. One of my Project Quilting entries from last year.


Winter Sleep - Another PQ entry - Theme was trees that week.


Lollipop Orchard. - String background. Another PQ entry.


Relaxing Starfish - My first ever entry for project Quilting.

Shirt Quilt


Make sure you find time to check out the other projects being posted today.


And if you missed any yesterday,  Here is the whole schedule.  We will be here all week! ...  well at least till Thursday. 

Monday, March 25th


Tuesday, March 26th


Wednesday, March 27th


=^..^=