Monday, November 10, 2008

Fall Colors


My postcards lately have been full of fall colors. Probably because autumn is my favorite season. I love the cool weather, the long sleeves, the changing colors, and most of all the pumpkins. This card is my "Pumpkin Patch" postcard for Fabricards. I embroidered the design on my machine, then I fussy cut some fall fabric to line the sides with. Again I used a fabric edging, but I added loose zig zag on top of it.


Next is the card I did for the Fabricards Monthly Challenge for October. The theme was "Nine" We could do anything we wanted as long as it was related to the number nine. I choose to do 9 squares each filled with 9 french knots. This didn't have to be a fall theme, but since I am in the mood of playing with fall fabrics, I chose to use them for this card as well. My card did not win the challenge this month, but it was fun to enter and watch the voting. To see the winner, you can go to the Fabricards group home page. The winner always gets a their card posted as the home page photo for the month.


This card was also made for Fabricards. The theme was leaves. For this card, I embroidered the leaves onto some fancy designed felt that I picked up at the craft store. It almost feels as if it is an embossed design on the felt. The felt is a deep brown, but it is showing up as black on my computer. I decided to add some pumpkins to go with the swirly leaves. The pumpkin fabric also serves as the edging. I folded over 1/4 of an inch of the pumpkin fabric to the back of the card and then sewed a single line around the whole card to hold it in place.


Another card made for a Fabricard swap, this leaf card was for the Pick-A-Word swap. Leaf was not the word I chose though. Instead, I picked the word "Echo". Still with autumn on the brain, I embroidered a falling leaf onto some swirly orange fabric and then "echo" quilted around it. This leaf has a red edging, with green center. The ones I sent out had just the opposite.


I finished up these cards this evening. They are for the Art 4 Mail Harvest Soup swap. I punched out some orange pumpkins and put them inside the mixing bowl. Then added some fussy cut leaves and such to the inside and bottom of the bowl. Again I used the fancy brown felt. I like the look of it and think it makes a perfect fall colored background. Still into the fabric edging, I decided to use that again on this card. But this time I used a blanket stitch on the inside edge to give it a different look. I made six of these. Four for my group, one for me and one for my mother. This is the one I kept for myself. Mainly because of the pumpkin on the front. It is the only one out of the six with a pumpkin sitting out of the bowl. The strip of fabric I was fussy cutting from had only one pumpkin on it, and it wasn't even a whole one. But I couldn't bear to throw it away, so I found a spot for it on this card. :)

Monday, November 3, 2008

Harvest Time


I really like how this card turned out. I guess you could call the center design "Orange" work since I only used the one thread color for it. For the binding I fussy cut some harvest fabric then folded it over and sealed it on with a straight stitch. These were mailed out to the ArtsNtheMail group. I have to make another set for my Art4Mail group. I wanted to do something a little different for those cards though since the actual theme for the Art4Mail group is called "Harvest Soup". I was envisioning a bowl of some sort on those cards. A bowl full of pumpkins. We shall see if the image I have in my head comes out as nice on the card. I'll post photos once they are finished.

Saturday, November 1, 2008

Autumn Postcards


I wanted my living room to be covered in fall themed postcards, and the best way I knew how to do that was to sign up for the ArtsNtheMail Autumn swap twice. :) I ended up making all my cards different this time. Similar, yet different. Usually I make 3 or 4 of the same card and then swap those and get 3 or 4 totally different ones and I always make one to keep for myself. It usually isn't hard trying to pick which one I want for me, because they are all the same. But this time they were different and I had a hard time picking one. I ended up just closing my eyes and choosing. The one I saved for myself is pictured on the left. Below is the a shot of all the cards I made. I had such a good time making these, I ended up making two extra instead of one. (One for me, and one I sent to my mother.) She got it on Halloween day while I was there visiting her. It was nice to be there when she got it. Funny thing was though, the stamp was never canceled. The card didn't even go through any machines. Which it should have because I only put a $.27 stamp on there. Oh well, one can never understand the mysteries at the post office.

Friday, October 31, 2008

Happy Halloween

Wahoo!! It's Finally Halloween. I am excited. Probably more so than the kids. I don't usually sew clothes, but once I year I break out the costume patterns and whip up some fun costumes for the kids. It's the only clothing I do like to sew, mainly because it is fun and doesn't have to look perfect. Ever since I discovered quilting over 10 years ago, I have been in love with it and would rather sew a quilt any day over a skirt or shirt or pair of pants. So here is my once a year "clothes" that I have created. I did 8 costumes this year. Four for my children and four for some friends.
These first four are my children. We have a Gnome on a mushroom, A Mummy, a Patchwork turtle, and a Tree. I sure had a good time making all of these. The mummy was probably the easiest. I just cut a ton of 3 inch muslin strips and wrapped them around my son, using safety pins to hold them on. Every year, my husband's work has a Halloween party a couple days before Halloween. At that party they have a costume contest which is split up into different age groups and prizes are awarded for best girl and boy costume in each age group. Each of my kids won for their category! I was very surprised at that and my kids were all super excited to be winners. It was the Mummy's first time ever winning. I was especially happy for him. :)

These four were made for friends. Since they live out of town, I had my daughter, son and neighbor try them on to make sure they would fit and so I could have a photo of them before I mailed them out. The first one is the witch costume I mentioned in a previous post, second is Cousin Itt from the Adam's Family. Then there is Cleopatra. The photo for Cleopatra was more of a first fitting. Later I added some gems and a fancy brooch to the costume, but forgot to take another picture of it before I mailed it out. Last is suppose to be a wolf. The pattern I had was a generic body suit where you add different items to turn it into the animal you want. My neighbor is modeling it and she said it looked more like a cat than a wolf, her mom said it looked more like a mouse... Ah well, It is suppose to be a wolf. There is a nice long gray tail but you can't see it too well in the photo. Also in the photo, I still had to hem the legs. They were quite long, but I wanted to make sure they weren't too short so I started them out long. Better to be too long at first, than too short. :)
Tonight we go out trick-or-treating to show them all off. For some reason I always last longer than the kids. Maybe as they get older, and I get older that might change, We shall see... :) HAPPY HALLOWEEN!!!!

Thursday, October 30, 2008

V is for Violet


This card was made for the "Letter V" postcard swap for ArtsNtheMail. I chose to do V is for Violet. Again I have used french knots to surround the borders of the card. I think I am addicted to these little knots. They always feel so nice when I rub my fingers over them. This time I decide to do a fabric edging instead of a satin stitch edging. It gives the card a whole different feel.

Wednesday, October 29, 2008

Black and Orange


I saw this orange and black fabric at the store awhile ago and was automatically drawn to it. But, since I am on a fabric diet, I refrained from buying it. Later on in the month though, I had to make a witch costume for Halloween and the person who wanted the costume had specific color requests for the costume: the dress had to be black, orange, purple, and green. Well, I knew exactly where to go to get the orange and black. :) And since I always buy a little extra material for my projects, (in case I screw up) I had plenty left over to make these post cards. These cards were made for the ArtsNtheMail Black and Orange swap. From the beginning, I had envisioned embellishing the black squares with some orange something or other, but wasn't quite sure how I wanted to do it. Then I decided hand work was the way to go. I alternated between rows of Daisy flowers with a bead center and a row of clustered french knots. I love the way it turned out. The best part is running my fingers over the top and feeling the texture of the thread. I hope the ladies who receive them like them as much as me.

Saturday, October 25, 2008

IFQ ATC Round 10


These sets of ATCs were made for round 10 of the IFQ ATC Alphabet swap. I was assigned the letters E and K and the numbers 8 and 9.
I chose to make E is for Easter Egg, K is for Keyhole, 8 pink flowers, and 9 planets. It is hard to see in the photo, but I quilted some leaves on the pink flowers with some light pink thread, and for the Keyhole I used a new technique of modge podging the image onto my fabric. I just received a V is for Vampira card from another postcard swap that was done this way and I loved it, so I thought I would try it out myself.

Tuesday, October 21, 2008

Halloween

The past few days I have been busy Making Halloween themed poscards. Halloween is one of my favorite holidays. I love the cool weather, all the change in colors, and all the pumpkins. I just can't seem to get enough of pumpkins. This card on the left was made for the Jack-o-Lantern swap for ArtsNtheMail. I also made an extra one for my October Mingle for Fabricards. When I think of October, I think of pumpkins. :)
I made this card for the Halloween swap for ArtsNtheMail. The background fabric is one of my favorite Halloween prints that I own. So far I have made a pillowcase and a bag with it, and now it is on these postcards. I still have a little more of this fabric left. Now I just need to figure out what else to use it for. :)
This card was made for the Halloween swap on Fabricards. I had just enough of the "Happy Halloween" ribbon to make enough cards for all the ladies in my group.

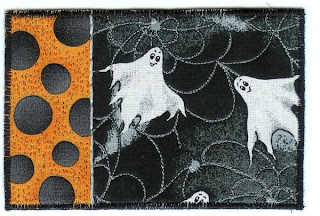
I signed up for two Halloween swaps on Postcard Pizzazz, one "Regular" and one "Crazy Quilt" These ghosts where for the regular swap.

These two were made for the Crazy Quit Halloween swap for Postcard Pizzazz. I am really loving the crazy quilt method. It is a great way to use up my small scraps that I can't bear to throw away.

Sunday, October 5, 2008

Postcard Wallhanging

I finished my postcard wall hanging quilt last night. The actual quilting had been done for weeks, it just needed to have the binding sewn on, which I did last night while I watched The Bee Movie with the kids. I used the pattern from Kate's Blog but made the shashing thicker and omitted the two rows of squares that separated the three sections of the the quilt.
The Quilt looks totally different when there are no postcards in it. I meant to take a photo of it empty, but in my excitement to add the postcards I forgot to take a photo while there were no cards in it. Halfway through filling it up I remembered the camera. Instead of taking all the cards out, I just decided to take a picture of it the way it was, half full. So the first photo shows it half full and you can see some of the empty squares. The next photo shows it full of postcards from all the wonderful people in my postcard groups. It sure was hard to pick 48 cards to display since I have so many wonderful ones to choose from. I will have to swap them out frequently to enjoy them all.


This is a close up of the quilting I did in the sashing. I was in "Feather" mode after making those feather postcards so I did feathers through all the sashing. I found it more difficult to guide this quilt through the machine after stitching on such stiff small cards. What a challenge it was.

Wednesday, October 1, 2008

Crazy Quilt Blocks

I'm still fairly new to crazy quilting and have only really done it on postcards. This time I joined a 8inch Crazy Quilt Block swap in my Art4Mail yahoo group. It was very different for me to work on flimsy fabric instead of a stablized post card. I think they turned out pretty good though. They are very similar to the postcards I posted a while ago. Same fabric. The swap said not to use cotton, and since almost every fabric in my stash is cotton, I had to resort back to these silks I had. I hope they ladies in my group like them.

Tuesday, September 30, 2008

Spider Webs and Back to School

I entered this spiderweb postcard in the Fabricards monthly challenge. So far I am the only entry. I just may win this time around. :)
I sure wish the scanner would pick up the sparkle in the gems on the postcard. This was my first time glueing on gems to fabric. I meant to buy iron on gems, but when I saw the huge red discount sticker on these little blue gems I forgot that I wanted them to iron on. All I saw was cheap crystal gems. Not sure how to glue them on, I decided to get out my super glue. So far so good, they are holding on tight to that silver gray web.


The kids have been back to school since the end of August, and to celebrate that I joined the back to school swap in my Art4Mail group. The white "paper" is actually peltex. I was too lazy to dig out my white fabric, so I used the small extra rectangle pieces of peltex that for some reason I can't seem to throw away. :)

Thursday, September 18, 2008

Feathers and Pie


What do feathers and fruit pie have in common? Well hopefully you don't ever have feathers in your pie but, it may be possible to have a bird near you while you eat pie. But in this case, Feathers and Fruit Pie just happened to be the two postcard themes I was working on this week. The four postcards on the left are the ones I made for IFQ. The theme was feathers. A lot of the participants for the group had already posted photos of their creations and most of them had actual feathers on the cards. I was getting worried because the only idea I could think of was quilted feathers. For a moment I thought I should scrap my original idea and come up with one that had tangible feathers on it. But nothing was coming to mind other than quilted feathers. So I went to the IFQ site to re-read the stipulations for the swap. It didn't say we HAD to put feathers on the card, just to make sure that if we did, not to use real bird feathers since it might cause trouble at customs when they go out of the country. After reading the guidelines again, I decided to go ahead with my original idea. After all, quilted "feathers" were feathers in a sense. :) I want the quilting design to stick out in the card, so I chose a deep purple background as my base and then used a light pastel variegated thread to sew the feathers. They turned out stunning. I had such a good time making them and loved the way they turned out that I wanted to make even more. I ended up making a total of 5, but on the last one I ran out of thread!! I had all the feathers done on it, but I didn't have enough thread to finish the stippling in between the feathers. I did have a double pink twist thread which I ended up using to finish the last card, and as I laid them all out to look at, I had to look very closely to see which one had the pink thread on it.


Now for the pie. :) These two cards on the right are my version of Blueberry Pie. I couldn't decide which would look better, diagonal lattice, or straight lattice. I guess it really depends on which way the pie is turned when you look at it. I am not a big fan of eating fruit pie, (unless it is a good apple pie and if you consider pumpkin a fruit, then I could eat plenty of that pie) but I do love the look of a stuffed lattice top with colorful red or blue poking out of the squares.


Coming up soon on my list of swaps are some crazy quilt blocks and Halloween. YAHOO!!!, I do love the spooky holiday.


Wednesday, September 10, 2008

Is it Autumn yet?

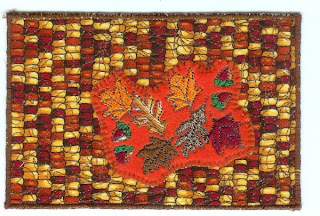
I sure want it to be autumn, but the weather here is still acting like it is the middle of summer. I am ready for some nice fall breezes and pumpkins sitting on my porch. So in anticipation of that, I have signed up for some autumn themed postcard swaps. These four cards I made for the ladies in my Art4Mail group. My initial plan was to embroider some leaves onto some orange fabric and put them on top of some corn printed fabric, but then I got to thinking that I already had some leaves embroidered out. Two years ago, I made myself a fancy Halloween hat. On the hat I embroidered all different sorts of autumn motifs. But before I put the final design on the hat, I sewed out a few samples to make sure they would sew out like I wanted. Being the pack rat that I am though, I couldn't throw away those samples. They have been sitting in a bin in my closet for two years.
It's a good thing I kept them. they were perfect for the cards I had planned to make.  So I went to my closet and got them right out of the bin they were in. I may keep lots of things, but I know where almost everything is. I seem to have a bin for everything and everything fits into a bin. :)
Below is a picture of the hat I made. After going through my photos of Halloween two years ago, I realized I didn't have a good photo of the hat, so I had my littlest one pose in it on the front porch for me this afternoon so I could show you what it looks like. I got the pattern from Embroidery Library.com. That is my favorite place to shop for embroidery designs. They have almost everything I am looking for and I get the designs instantly on my computer once I pay for them. The site is awesome! They actually have two sites. One that sells the designs (emblibrary.com) and another that has all sorts of free project links.

Tuesday, September 9, 2008

Pizzazz QTCs


Postcard Pizzazz had a quite a few QTC swaps with colors as themes. One of them was called Summer Glitz 2 for 1. We each made a gold and silver QTC and sent it to our partners. Here are my two. In the beginning I read the rules wrong and was making ONE card with silver and gold on it. So that is why my silver card has some traces of gold. I had already finished the silver one when I realized my mistake. But the ladies in my swap said they were fine receiving the silver card the way it was. I was glad of that otherwise I would have had to make another whole set of silver ones.


-----------------------------

These were made for the Pink QTC swap. I took bits and pieces of all my pink fabrics and ironed them onto the peltex and then added a chain stitch to cover up the raw edges. Then I added some form of embellishment to all the pieces, except the very thing pink stripped one at the very bottom left. It was too small to add anything. I didn't want it to get stuck under the needle down there while I had to sew on the edging. These were the only ones I remembered to take a group photo of. The others I had put in envelopes and had them ready to mail out. So I had to take a photo of the ones I saved for myself.

This one is my version of a BLUE QTC. The center blue is what was leftover from me trying to make blue inchies. It is s stiff piece of Peltex covered with some light blue fabric. I can't seem to throw anything away. Even if it is only one inch. I think to myself, I can use that in some other project in the future. And sure enough, the little one inch covered square finally found a new home on this blue QTC.


--------------------------------------

I liked the feel and texture of the raised blue square on my blue QTC, so I decided to try that same technique in my purple QTCs. This time I punched out the letter P in purple covered peltex. Instead of sewing it down with yarn, as I did in the blue QTCs, I used a blanket stitch to hold the letter down. Underneath the P is some shiny purple fabric. It is hard to tell that it shines on the photo, but in person it looks great. I couched some cording around the shiny fabric to hide its raw edges, and then finished the corners of the card with some free motion quilting. Once all the QTCs have been traded I will have a wonderful unique rainbow in 3.5in x 2.5in rectangles.

-----------------------------------


My time wasn't used making just QTCs lately, I also made a regular sized postcard.

I had plenty of butterflies and dragonflies left over from my Jars and Bottles Swap, so I used them for a few more postcards for my Art2Mail #46 swap. This time I added some grass for them to fly around in with a nice blue sky and the card wouldn't be complete without some free motion quilting in the graa and sky.

Friday, September 5, 2008

Where did August Go??

Wow, I can't believe I haven't posted anything here in over a month. Were did August go? It came and went faster than I anticipated. I guess I was busy with kids, vacation, the last days of summer, and school starting that the month just flew by. But I was not unproductive, I did manage to find time to create a few goodies for the ladies in my swap groups:


These three sets of ATCs (artist trading cards) were made for the Alphabet/Numbers swap on IFQ. These were for round 9. I was assigned the Number 4, the Letter N (Night), and the Letter T (Tiny Turtle). These were mailed out on the 29th of August. This is my third time participating in these rounds. The goal is to collect all the letters of the alphabet and the numbers 0-9. I have just been putting them in a basket on my coffee table to enjoy them as I receive them, but now I think it is time to make the Alphabet wall hanger to see how many I have of each letter, and to see which ones I need to fill in my alphabet gaps.


This card was made for a "My Garden" swap in the Art4Mail yahoo group. When I signed up for this one, I automatically thought of my vegetable garden. It is the only type of garden I have. I definitely don't have a green thumb and I am lucky my tomato plants have survived the whole summer this year. I hand cut out each of these vegetables and appliqued them onto the card.


Here I decided to try a new technique I saw on someone else's web page. They had taken yarns and other fibers to create a background. So I tried it myself. I put a piece of decor bond, sticky side up and layered orange, blue and purple yarns on it. Then I ironed it down to make them stick. They were a little fuzzy and I wasn't sure they would go through the mail without a clear envelope, so I used some tule and layered it over the threads to hold down the fibers that were sticking up. Then I added some orange fish and finished it up.


I was just playing around with some leftover shapes that I had cut out and came up with this card. I had punched out a lot of clouds out of white fabric earlier in the year for some other post cards and I had a few left over, So i turned them into a "Every cloud has a silver lining" card. I used some silvery crochet thread and hand couched it to the bottom of the clouds.


The Alphabet... The theme for this swap was " What A means..". I had the idea of Alphabet automatically but wasn't sure how to put that on a card. Then I saw this image online. It is a actually a quiz. Every letter comes from a logo of a famous American brand. I fancied it up with some zigzag stitches in between the letters and some green and yellow iron on gems. I mailed it to its recipient and told her to email me when she got it and I would send her the answers. I had fun with this one. :)


This next card was made for a "Jars and Bottles" swap for my ArtsNtheMail group. I picked some organza, cut it in the shape of a jar and put some bright butterflies and a dragonfly escaping the jar. I really like the way this one turned out.


Here is my finished Light house card. I embroidered the lighthouse onto some blue fabric and then free motioned quilted around it. On the bottom I tried to mimic the waves that were already in the embroidery design. If you look close you can see the curvy waves of the original design blending with my own free motion design. On the top I changed the free motion to an echo design, echoing the shapes of the top of the light house and the clouds. I love the texture that the quilting designs have made. This is one I like to hold and feel it as well as look at.