Monday, June 29, 2020

June Challenge - Island Batik Ambassador


June was a free theme for Island Batik Ambassadors.  That meant we could make anything we wanted!  I knew I better decide on a project fast, otherwise I would dilly dally with a hundred different ideas and end up rushing at the last minute to finish one.  


This quilt came about from a comment made by one of my young friends, Christopher. It was a comment he made on my fabric giveaway post last month on Instagram. To enter the giveaway you had to leave a comment about what you would make if you won the fabric. Christopher commented, "I'll keep it and ask my friend's mom to make me something memorable for my apartment during/after college."

Of course his friend's mom is me. Well, the random generator didn't pick Christopher's comment, but I could not pass up this opportunity to make him a quilt, particularly since I already knew what fabric colors he liked!

The fabric line is River Valley designed by Kathy Engle for Deb Tucker’s Studio 180 Design.
Island Batik had given me plenty of fabric for my May Challenge so I had enough left over to make something for Christopher. I just needed to find a pattern that fit the amount of fabric I had left.

I asked my son if Christopher would like triangles. He said, "Sure. I think he would like anything you made." So I decided to recreate the Diamond Bar quilt I made in February using River Valley.


This quilt is made using two different triangle blocks.  One with a large colored triangle center surrounded by neutral bars, and one with a small neutral colored triangle surrounded by colored bars. 
These are similar to making log cabins, but with triangles instead of squares.

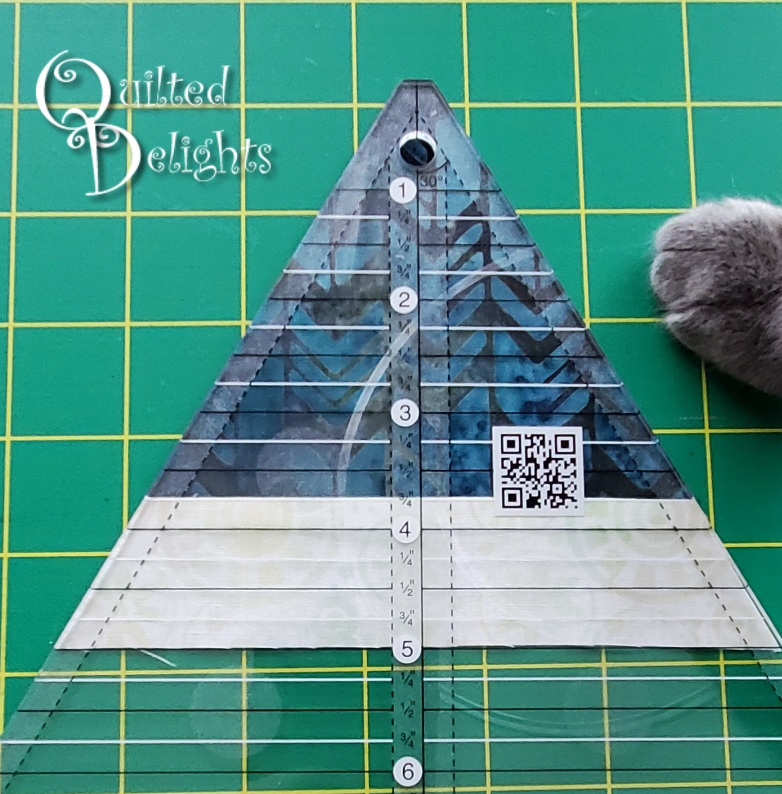
Below are the measurements I used for cutting my triangles.  If you want to make your own you can use your favorite 60 degree ruler to cut your peices.

Triangle A: 
Colored Center
Using a 60 degree  ruler, cut 36 triangles from a colorful 4 inch strip.
Using neutral fabrics cut 1 1/2 inch strips. Line up the 5 inch mark on the triangle ruler with the bottom of the 1 1/2 fabric strip and cut out 36 bottom bars. Do the same, lining up the ruler on the on the 6 inch and 7 inch line and cut 36 pieces of each.

Triangle B: Neutral Center
Using a 60 degree ruler, cut 36 triangles from a neutral 2 1/2 inch strip.
Cut the outer bars from 2 inch colored strips.  Use the 4, 5 1/2, and 7 inch markings on the triangle ruler to cut 36 each colorful bars . Cut 36 of each size.  Or you can sew and trim each section one triangle at a time.

I used the off white fabric I had left from River Valley and then supplemented the rest with Whip Cream from Island Batik's Foundation fabrics.  Whip Cream is perfect for River Valley since it has very subtle hues of green and blue.


I cut all the pieces out and sewed a little on it several days throughout June. Some days it was just 15 minutes a day, but progress was made each time. This past weekend, I finished it up.


For the quilting I wanted a color that would show well on all the different fabrics.  I didn't want white, because that would be too bright on the dark fabrics, and a dark blue thread would be too harsh on the whites and creams, so I went with this beautiful aqua color from Aurifil.  It blended perfect on all the fabrics.


I quilted it using Hobbs Natural Cotton Batting. I had a bag of leftover batting and pulled out a piece that was wide enough, but not long enough, so I pulled out another piece to see if it was wide enough to piece together and low and behold it was the perfect size! No piecing batting together this time. Yay!


And of course I used Schmetz Needles. They never disappoint.


The orignal quilt I made had white edges, but I decided to change that up a bit for this one and went with a printed border.  

Hope you enjoyed this quick quilt.  Be sure to check out all the other Island Batik Ambasadors to see what they have been playing with this month.


Now I need to give Christopher a call,  and let him know he has a new quilt to pick up.


=^..^=

Tuesday, May 12, 2020

The Ultimate Home Decor Blog Hop


Welcome to Week 2 Day 2 of the Ultimate Home Decor Blog Hop by Island Batik. 


I was sent a lovely bundle of River Valley designed for Deb Tucker’s Studio 180 Design by Kathy Engle.  It should be hitting shops this month.  Island Batik was very generous to send so much for small home decor projects. That means there is some left over to share, but I'll talk more about that near the end. :)


First up I want to show off these two pillows.  I love the look of Cathedral Windows quilts and knew this was a good way to show off these fabrics. There are lots of tutorials on line about how to make these types if Cathedral Windows and one of my favorites is from Diary of a Quilt Maven called Faux Cathedral Windows Pincushion Tutorial.  The tutorial is for a small pincushion, but it is the same concept if you want to go a little bigger. I like her tutorial because it shows how to use tiny dots of basting glue to hold your white folded triangles down.  It works so well I  skip her step 5 where she says to sew all around the edges of each covered square.  Instead I let the glue do its work and start sewing squares together.


Other than the outer border and the back, the whole project is made from 2.5 inch squares.  My pillow is 6 x 6 squares. For each square I needed two white squares folded in half on the diagonal.  I used the foundation by Island Batik called Whip Cream for this.   I have 36 River Valley blues hiding underneath those 72 white triangles.


Next I laid out all the greens on top.  I glue basted these down as well.  It made it so much easier to roll back the bias edge of the white and machine stitch them down. 
I used Roxanne's Glue Baste It.  It's my favorite.  It dries quick and doesn't bother the needle when sewing.


Since I used the blue squares underneath, when I roll back the white, all the blues peak out.


Here is the back side before I trimmed off the greens and added the back side of the pillow.  I pressed all my seams open.

I got to wondering what the pillow would look like with the green underneath and the blue on top, so I decided why not make another one and see.


These are the blues glued down ready for the green to peak out.


I added a 1 inch border around the block so it would fit perfect around a 14 inch Pillow form.
Here they are, almost twins but not quite.


For my mini quilt scene,  The name River Valley and all the blues and greens in this line had me thinking about birds on the river.
Early this year I bought a 4in x 9in Table Top Tri-Stand from Calla Lilly Quilts in Greensboro, NC.  They had a cute display with several patterns for every season from Quiltricks.com that fit perfect  in the frame.  I went to the Quiltricks website to find a bird pattern for the frame, but they didn't have one yet,  so I drew up my own.


A white bird with green feathers enjoying the river water among the cat tails.


I drew all the shapes and then copied then onto some HeatNBond, pressed that on the fabric, and cut out each shape easily.  Some of the pieces are thin so I couldn't really do a satin stitch around each piece, so I sewed a straight line around them using several different colors of Aurfil Thread for a raw applique.  The only pieces that are not part of the River Valley line are the orange I cut from some other Island Batik scraps and the cat tails.  They cat tails came from leftovers from the Cascadia line.  Doesn't' that brown with blue strips go perfect!

These little mini quilts are the perfect size to use up scrap batting. 
I used Hobbs Natural cotton batting leftover from my Lily Patch Pads quilt.

Now it is time to talk about sharing. 

I have two giveaways to tell you about today.  First, Island Batik is giving away TWO Fat Quarter River Valley Packs,
You can enter on their blog or use the Rafflecopter below.  


Second, I am made two charm packs from the leftovers and am giving them away to one of my followers on Instagram. 
Check me out on Instagram on @quilteddelights and look for this photo below to enter.


And be sure to visit  Sandra Walker  to see what she made with River Valley.


=^..^=


Thursday, April 30, 2020

Creative Borders - April Island Batik Challenge

Lily Patch Pads. That is what I am calling this one. As I was making it, he white squares in the small nine patches along background fabrics remind me of flowers on lily pads.


This quilt came about in a unique way. It was made for the April Island Batik Challenge Creative Borders and Bindings and I actually designed the borders first. Then I figured out what I wanted in the center.

It actually started out Blue and Yellow in EQ8 and had an extra  outer border, but I really wanted to play with the Cascadia strip set by Claudia Pfeil for Island Batik (Shipping in May)  so I went with a colorful scrappy sort of look.  As I was making it scrappy I fell in love with the background fabric I was using, an Island Batik foundation called Moonstone, and I wanted more of that showing in the quilt, so I swapped out the paper pieced outer border and made it all Moonstone fabric and cut it curvy like lily pads.  It was probably a good decision, I had another 20 hours or more of sewing needed to paper piece that second border and not enough craft hours left in the month.


Look at all these fun colors in Cascadia. These made up the nine patches and star blocks.
For the center of the nine patches and the Ohio stars I used the Island Batik foundation Sunshine.  And the white background is of course my new favorite foundation Island Batik print, Sprinkles.

The 2.5 inch strips fit perfect on my Triangle in a Square Die for my AccuQuilt cutter. I trimmed a few inches from each 2.5 inch color strip and ran it through the cutter along with the Moonstone fabric.

I love cutting odd shapes with the AccuQuilt.  When piecing everything lines up perfect.

Since I was using 2.5 inch strips, I had to cut the quarter square triangles with my regular ruler, which meant squaring things up when they were finished. 

I sure was wishing AccuQuilt had a die that catered to 2.5 inch strips for Quarter Square Triangles, that would have been perfect for this project. They do have a 2 inch Quarter Square die, and I own it, but it isn't laid out for 2.5 inch strips. Maybe I will drop them a line, I would love a whole set of dies just for use with 2.5 inch strip sets! Can you image all the small 6 inch blocks I could create full of color and scrapiness from 2 inch strip sets!

These nine patches were small. I had to cut those strips 1 3/16 inches. I don't even have a ruler with 16ths on it. So I eyeballed it. Had to trim some down to size, but it worked.

Next was the layout.  It was hard to not get same fabrics to touch, but I made it work. This is when I kept seeing flowers on lily pads.  There has to be a watercolor print out there with flowers and lily pads on it somewhere.


Adding the nine patch border. I love nine patches and actually added created this border first.


As I was making this one I knew I wanted to try some fancier quilting in the blocks and definitely in the wide outer border so I gave myself some extra time for quilting this month.  I used the Chrome Microtex needles by Schmetz that came in my ambassador box.  They worked great in my machine.


I quilted it using Hobbs Natural Cotton batting with Scrim binder.  
I really love this batting.  It quilts up so nice!


The quilting started out fantastic.  I used some Yellow Aurfil 50 wt Thread #2210 that came in my last ambassador box.  It is a light yellow and even looks good on the white background.


I got one side of the outer border quilted along with all of the blocks in the center.


The quilting was humming along not a problem. I even filled several bobbins of thread and then...


As I was quilting around the 9 patch border my needle kept skipping stitches.  I thought that was odd since I hadn't changed anything recently, I was already halfway through a new bobbin.  So I thought maybe I wore out the needle.

I re-threaded the machine and put on a brand new needle. Still skipping.  I re-wound the bobbin, tried new thread, changed tension settings, and even made sure my needle size was the right size for my thread even though I had already quilted more than half the quilt with that same combo.

I tired everything I could think of and everything I could find on the internet but to no avail.
The machine kept skipping stitches.

After playing around I realized I can move the machine left, right, and down and nothing skips, but when I push it away from me it won't grab any stitches at all.  If anyone knows how to fix this please let me know!  

After hours of playing with it and ripping my hair out I decided to take it off the frame and go ahead and put the binding on without all the quilting in it.


I did finish quilting the first inner binding and the 9 patch binding on my regular machine, but the outer border will need to be marked so I can make it match the other side.  I don't like marking my quilts, it takes too long and that will take me longer than April is long, so I am calling this one finished for now.  It measures approximately 64 x 50.

Even without that other side of the outer border quilted I still love it.  All those wonderful colors, and that Moonstone fabric is a new favorite!  It plays well with every print in the Cascadia line.


=^..^=