The other day I worked on some fabric postcards. This particular swap was themed "Black and Orange".
I had the idea in my head of what I wanted to do for these cards, but I couldn't find the right sized paper pieced tree pattern, so I made my own. As I started the paper piecing process I kept having trouble lining up my next piece. I'd use the light box to help line it up, but then things would shift as I took it to the machine. and I wasn't quite sure where the line was anymore. I would either have the top too far off or the bottom in the wrong spot, so I decided to try it a little different.
Instead of trimming the pieces to a 1/4 in seam allowance AFTER I sewed the pieces together, I decided to trim it BEFORE the actual sewing. Here is what I mean:
This is what I have so far. It is ready for the next piece of fabric.
I flip my paper over. The piece I am adding next is piece #7.
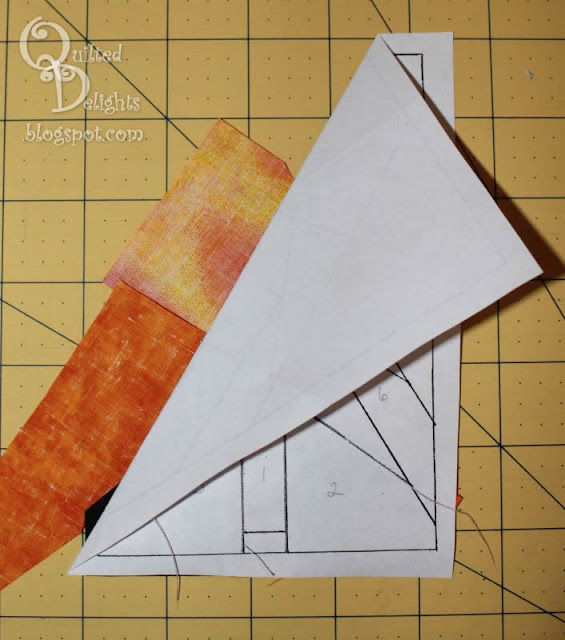
I find the line I am going to sew on next and fold the paper right on that line.
Fold it all the way and crease it. You can now see all the extra fabric from my last few pieces.
Line up your ruler and trim that fabric off.
Since I was making a postcard that won't get washed, I used a 1/8th seam allowance.
Flip your block back over.
You now have a nice straight edge to line up your next piece with.
Line it up and take it to the machine.
Sew on the proper line.
Press that piece open
The iron not only presses the fabric, but it also presses out the crease you just made in the paper.
Continue the process for the rest of your pattern.
Feel Free to use my Paper Piecing Tree pattern to make your own 4 x 6 postcard.
These trees would also look great as Christmas trees, or winter evergreens. or even pastel spring trees.
The possibilities are endless.
Four pretty orange trees making their way across the US.
=^..^=


