Monday, September 20, 2010

Postcard Booth

About three weeks ago, I was asked to participate in the Tobacco Festival.  The person in charge of the Artists's section of the festival wanted me to display and sell my postcards.  So I spent the past couple weeks getting ready for the event.  And this is the fruit of my labors, my own booth at the event.  My daughter is in the photo posing at my booth and she was going to sit with me all day, but she found some friends and they went to enjoy the festival.  I didn't mind.  I would rather her have a good time with her friends.  They did stop by every now and then to check in and say hi, which was nice. When I first got the call to participate, I had plenty of postcards and ATCs to show from my collection, but I didn't have any to sell.  So I had to make a few so my booth wouldn't be so bare.

  I wanted to have a whole table full, but time didn't permit me to make that many.  What I did have time to make turned out to be enough.  I ended up selling four postcards and probably would have done better if there would have been more people walking by.  The "Artists on the Green", as we were called, got a raw deal that day.  If  the city would have decided to keep the main vendors across the street from us, instead of move them a couple blocks down then we would have had as much traffic as the rest of the festival.  The people would have naturally flowed over to our event, but since the main vendors were were moved a couple blocks down most people didn't even know where we were.  My husband had to tell a couple of his friends and our neighbor where to find me.  A few  of them made their way over, but others never did.
  Towards the end of the day I became miserable and bored.  It was super hot, temps in the 90's.  The heat is mainly to blame for my misery at the end.  But, if there would have been people walking by to chat and discuss postcards with, then the heat would have been a bit more bearable.  But sitting there doing handwork in the heat, not talking to anyone was just not fun. I actually became bored which it is rare for me to be bored. I was ready to be home and work in the comfort of my AC.
    The coordinator of the event felt so bad that she told us all that even if we did have sales that we could to keep the 15%  booth fee we owed her.   She did tell me she has other fiber art events coming up soon, though and they have been successful in the past and she would be in touch with me again.
   Over all though, minus those last two hours,  I must say I did enjoy the event and getting ready for it.    I even enjoyed the first couple hours sitting in my booth.  It was my first experience ever trying to sell my own items at an event, so I was excited and the very few who did come by were quite interested and were a joy to talk to.

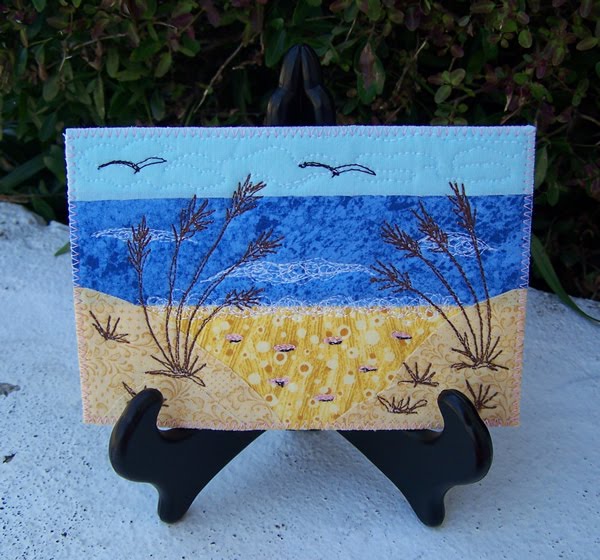
  These next photos are the postcards I made for the event. These first ones are brand new ideas and there is only one of each of them.

These next ones are similar to ones I have made in the past and I made multiples of them.  
  • 1 Log Cabin Quilt Block Postcard
  • 3 Candy Canes postcards
  • 7 beach postcards - I sold two of those.
  • 2 Halloween Ghost postcards - I sold one of those.
  • 4 Pumpkin Halloween postcards 


The other one I sold was a red and black spider web postcards with iron on gems.  I had made it about a year ago, but since I had a duplicate at home, I went ahead and sold it.  That is why there is a missing slot on the postcard display on the right in the booth photo above.  I sold that card while I was setting up the booth.  

Friday, September 17, 2010

He's at it again...


Here is my kitty Sheen.  You may think he is just watching me sew this fabric bowl, but no, he is waiting for his chance to attack the cord hanging down ....


Caught in the act!


He makes my sewing come to a complete halt on more than one occasion since I don't want to risk getting his paw with my needle.  After a few minutes of letting him play with the cord, I sent him on his way so I could finish my project.


Thursday, September 16, 2010

Three more Mosaic Color Play


These are the newest blocks I made for the Mosaic Color Play swap over at IFQ.
The first went to South Africa, the second to Portland Oregon, and the third one is on its way to Australia.
I have received all my blocks, but my last partner is still waiting for hers to arrive even though we mailed them on the same day.  Post coming into the USA seems to be fast, but unfortunately post going out seems to take two to three weeks longer.

I want to sign up again because I had so much fun swapping squares and making blocks, but I am afraid I won't get another 12 blocks before next October when the sign ups end.  It took me over a year to get the first twelve.  I sent out my very first square in the beginning of July of 2009.  One year and two months later I have 12 finished blocks.

Tuesday, September 14, 2010

Two New Rag Quilts

I finished up two rag quilts this week. They are for two very special clients and they both needed them about the same time, so I cut, layered, sewed, snipped, and fluffed them both at the same time.  It didn't feel like it took too much longer than normal and I ended up with two finished rag quilts this afternoon.


Sheen is always there "helping" whenever I get out the rotary cutter or turn on the sewing machine. Here he is hindering progress on the more pastel colored rag quilt.

Friday, September 10, 2010

Another Quilted Quilt


I finished quilting this quilt the same time I did the 4 patch swirl,
I just forgot to add it to that post.  So here it is now getting its own post.
This one was pieced by another guild member and will be donated to a boys home in the area.


Since you can't really see the quilting in the large photo,
I did a close up shot of the free hand meandering stars.


Thursday, September 9, 2010

Cathedral Window Pin Cushion


My swapping friend from Australia sent me a snail mail yesterday and inside was a sample of a unique way to make a cathedral window using two background colors.


I was memorized by the sample she sent me and just had to make one for myself.  I grabbed three of the closest fabrics I had and got started.   I wasn't even worried about the colors playing nice together because if I screwed up big time I was going to chuck it in the trash and not feel bad.

The scraps I used were from my 1.5 inch bin, so my finished window was 2 inches.  It turned out pretty good, so I decided to totally neglect my house chores and the two rag quilts I am suppose to be making and turned my small cathedral window into a pin cushion.  I picked out the rest of the 1.5 inch squares that matched the top and whipped it together.

I put some peltex on the insides and on the bottom to make those areas stiff.  Then I cut two 2 inch pieces of batting and placed those underneath the top of the window for softness.  Then I stuffed the whole thing with plastic pellets, hand stitched the seam shut, and sat back and admired it.   What a neat way to do cathedral windows.  Thanks Mandy!!!

Wednesday, September 8, 2010

Quilted 4 Patch Swirl


Here is my newest finished customer quilt.
This quilt was pieced by one of my guild members during a
class we had in the spring called 4 Patch Swirl.
I wanted something to liven up the flowers so
I tried a free hand butterfly swirl for this quilt.


I was worried about it at first since it isn't that visible on the front,


but when you turn the quilt over on the back,
WOW, the butterflies look wonderful
against that large spot of red.


I love how it turned out!


Monday, August 30, 2010

Playing with Windows


    I was at one of my guildies house the other day to visit and she showed me some of her quilts, which were to die for, and one of them was a cathedral windows quilt.  It was amazing.  All hand stitched and beautiful.  Before I left, she gave me a couple bags of her left over scraps and in one of the bags were pieces of white fabric already folded for a cathedral window quilt.  I have always wanted to make one for my own, so when I found those two white squares already folded up, I decided to play around a bit.
     First, I made the small cathedral pin cushion.  It has a window on both sides.  I had to do some manipulating for the windows to show up on the top and bottom for a pincushion, but it was fun.   Then I wanted to test someone's theory on the internet about how what ever size sqaure you start out with, the finished square will end up being half that size after you are done folding.  So I started out with a 4.5 inch block in hopes that after turning a quarter inch in for seams and then doing the other folding it would turn into a 2 inch block.  Sure enough it did.  So I made 8 more and made this very small cathedral windows quilt.  Its finished size is 6 inch square.  I machine stitched the windows and it is a bit wonky, but it was good practice for when I finally start on my real big quilt sometime in the future.

Friday, August 27, 2010

A Nifty Wallet

It's birthday time again!  Well, for my daughter's friend that is.  My daughter already made her friend a handmade beaded bracelet, but we wanted to get her something else to go with it so I told my daughter I would pick something up for her at the store today while she is at school.  But as I sat this morning trying to think of what to purchase, I decided I would rather make something instead.  Unless I know specifically what someone wants in a store, I don't usually like to purchase store bought gifts.  I have always preferred to give handmade gifts when ever possible.  I can't help it, it's just what I do.   It just seems more personal to me.


This time I have made a wallet.  The pattern is a free tutorial from Sew Christine. Mine didn't turn out quite like hers though, because I screwed up the zipper hole placement.  The tutorial said mark 1 inch down from the pocket, sew, and cut.  Since the photos were close ups and didn't specify which end to cut,  I ended up measuring from the wrong end, which made my the hole for my zipper on the wrong spot on the lining.  I wasn't about to cut out another set of fabrics, so I improvised.  I moved the credit card pockets up higher and cut off 2.5 inches from the bottom of the lining and sewed it back on to the new top part of the wallet.  This positioned the coin pocket at the bottom of the wallet instead of the middle and also prevented the credit card pocket from being upside down, which was another option I could have gone with, (which I am glad I didn't).  Then I finished with the rest of the instructions.  I also used fusible fleece for the outside so I could have a quilted wallet, and I also added the name to the front. My husband says all my handcrafted gifts should have the person's name on it somewhere.

I hope she likes it!!

Monday, August 23, 2010

My First Hand Quilted Quilt

 Yay! Another project finished!

This quilt was stared in June of 2008 and I put the last binding stitch in last night.  This is my first experience hand quilting.  I didn't hand quilt the whole top myself, but I did do a good 80% of it.  Two years ago I was asked to demonstrate hand quilting at the local bean festival in town. I had a few ladies from my quilt guild helping out as well as my daughter and a bored little girl from another booth.  Unfortunately, we didn't get very much quilting done at the event so that left me with the majority of the quilting to finish up myself at home.


I really wanted to get this quilt off the UFO pile.  So these past couple months I made it my priority to finish up this quilt.  I am excited that this is my first hand quilted project.  I must say I am no expert in hand quilting yet.  But with more practice I should be able to eventually get nice small even stitches.

Saturday, August 21, 2010

Small Zipper Purse


My daughter has been telling me I have made a bag for everyone but her.  And she is right.  I've made bags for her friends, my friends, myself, my extended family and my extended family's family.  I even made tote bags for my boys to carry their treasures in.  But I still hadn't made one for her.  So for her birthday I surprised her with her very own hand made bag.  She had already picked out the fabrics but she didn't know I was going to make the bag so soon for her.  She was still under the impression she wouldn't get one till she was 30.


The bag she requested had to have a zipper closer and had to be small, but not too small. It took me a while to find a pattern that fit her wants and looked nice.  That is probably why I dragged my feet so long on making her bag.  Then this week the thought hit me to look on Etsy for a pattern.  I figured there should be some pretty bags on there made by individuals, instead of big companies, that would fit what I was looking for.  Sure enough I found the pattern for this bag.  The bag is very cute, but the pattern had a few hard spots that left me wanting to rip my hair out, which is odd for me because I have never had any trouble reading patterns before.   Needless to say, what should have taken 3 hours turned into a 9 hour project.  But the end result was worth it.   My daughter loves it and she has already put all her things in it and taken it to school. So the bag is a success.

Monday, August 16, 2010

Beverly's Quilt

Here is my latest project.  This quilt was made by a lady in my quilt guild.  She said she wanted something swirly on it, so per her request, I did an all over free hand loopy swirl design.  This quilt was fun to work with.  The colors are nice and bright and fun.

Wednesday, August 4, 2010

Machine Quilting

I finished another clients quilt yesterday.  When trying to decide what over all design to put on this quilt I took my inspiration from the green sea life fabric.  I wanted to have some wavy sea weed type lines all over the quilt.  So I used a version of the Mud Flats design from the 365 days of Free Motion Quilting blog.

My version doesn't look quite the same as the one the blog, but I am still happy with the results.  I suppose I am use to making freehand feathers, so what was suppose to look more like wavy Vs turned out to look more like half of a feather.  I did end up spending a little more time on this quilt than I normally do because of the density of the quilting, but I wanted it to look a certain way and I accomplished that goal.

Friday, July 9, 2010

Full Bobbins

I have very few bobbins for my sewing machine. 5 to be exact. I did buy a pack of 20 a while ago, but they don't fit my machine. The package said they were for Bernina machines, but I should have read the print on the back that said what specific machines they were for before I bought them.
    I don't really enjoy un-threading my bobbins in order to put a new thread color on them, but I have done it many times as the need arose.  The other day I needed to a turquoise thread in my bobbin in order to quilt a client's quilt.  Unfortunately, all five of my bobbins were full, and not one had turquoise thread in it.  I was definitely not in the mood to change the thread out. So instead, I put my client's quilt aside for the time being and inserted my bobbin full of white thread into my machine and pulled out some of my UFO's.
     My plan was to finish up some peicing until I ran out of white bobbin thread. Then I would have a free bobbin to load my turquoise thread. Since I felt the need to start machine quilting my clients quilt right away, I was motivate to quickly get some of my own piecing done. The first UFO I started on was my two tone purple quilt. I started this one about 8 months ago but then put it aside when I mis-cut all my large purple squares by half an inch. I must say that is how I get most of my UFO's. I screw up during part of the piecing process and then, in my frustration, I put the project down for awhile, sometimes a long while.  But this day I re-cut my purple fabric and finished sewing together the last outer squares to complete this top.

I still had some while bobbin thread though, so I pulled out another project I have been working on for even longer, at least 7 years or more. For this project I was taking scraps of fabrics I had been using for other projects and turning them into 4 patches. I decided a while ago, though, to not make any more patches, I have almost 200, and instead started the process of adding a yellow border on all of them.  I got a few more borders complete, but not all of them since the bobbin finally ran out.

Which is prob a good thing because I am short 1.5 yards of yellow fabric.  I thought, no prob I'll just go to Wal-Mart and get more because all the years I have lived in this town, (12.5 years) my Wal-Mart has carried this same bolt of yellow fabric.  But to my dismay, when I went in, they didn't have any.  They didn't even have a slot on the shelf for it.  I was shocked.  What am I to do?!?  Sure I could border half the four patches with blue.  That would make a wonderful blue and yellow mixed border 4 patch quilt, but that would mean I would have to rip off over 200 three inch side borders.  Not something I am looking forward too.  I have decided to go back to the Wal-Mart when the fabric department manager is working and ask if she can order this particular bolt of fabric for me one more time.

Thursday, July 8, 2010

Machine Quilting For Others

I am trying to raise money to finish my quilt studio upstairs and to help with the cost of renovation, I have offered my services as a machine quilter.  Now, I don't have a long arm -yet- so all my work is being done on my domestic sewing machine and a few of the ladies in my quilt guild have graciously offered to let me work on their quilts. So far I have finished two quilts, and have a third in progress.

The owner of this first green quilt specifically requested a very loose meandering.

 On this second quilt I did a swirly meander and then a little leafy swirl on the border.


The quilt I am currently working on is enormous! 130 x 110. I barely had enough room on the hardwood to pin baste this monster. As you can see, I can't even get the whole quilt into the photo. But it is now basted and ready to go. This one will also have a swirly meander on it.    There are a lot of puckers in this quilt though, so I hope it will turn out all right with a loose swirly quilting.